LEARN@IGP
8
Section Toolbar
The Section Toolbar allow the addition, configuration and deletion of FX defined sections into any part of the document. There is a list of prepared section templates for frontmatter, body, backmatter and specials. This toolbar also contains infinite Section History, revision management and deleted page history. Updated: 2012-07-27
Overview
Sections are the backbone of IGP:FoundationXHTML (FX). An FX document is a controlled sequence of sections.
Document Sections are highly defined and controlled in FX. You cannot make ups ection names, and you cannot misuse the defined section syntax without risking processing failure.
Remember FX is a controlled trustworthy XHTML. It is selector grammar and syntax control that makes it so.
Section Rules
You should remember and understand the following rules about sections.
- You can only use the supplied named sections.
- Section must be first children in the galley-rw element. Sections can never be nested.
- Section selector names are always CamelCase-rw with the -rw suffix. Never use other selector statements with capital letters. All FX CSS selectors are lowercase except for named sections.
- Frontmatter sections, body sections and backmatter sections must be inserted in that sequence or processors may fail. Specials sections can be inserted anywhere in the document flow.
- Sections have a very explicit grammar. Do not overload or misuse section names or you will reduce the future value and trustworthiness of the content.
- There are grouping Sections such as Part-rw, Unit-rw and content sections such as Lesson-rw, Chapter-rw. Use them correctly as processors use them to create nested TOCs in output formats.
- There are special format processing sections that must be used explicitly correctly. These include Landmarks-rw, BriefTOC-rw, WebNavInstructions-rw, WebAppInstructions-rw and MetadataWork-rw as examples. None of these appear in final output work. All of them must be used exactly correctly.
Section Toolbar 
Click on the Section Tools button to show or hide the Section Toolbar.

There are four tools. From left to right
New Section. Allows you to insert a new section directly into a document at any position.
Section History. Shows the section revision history in the tools panel.
Delete Section. Lets you delete the active section or all sections.
Delete Section History. Lets you view pages that have been deleted and who deleted them, and if necessary retrieve the content.
New Section 
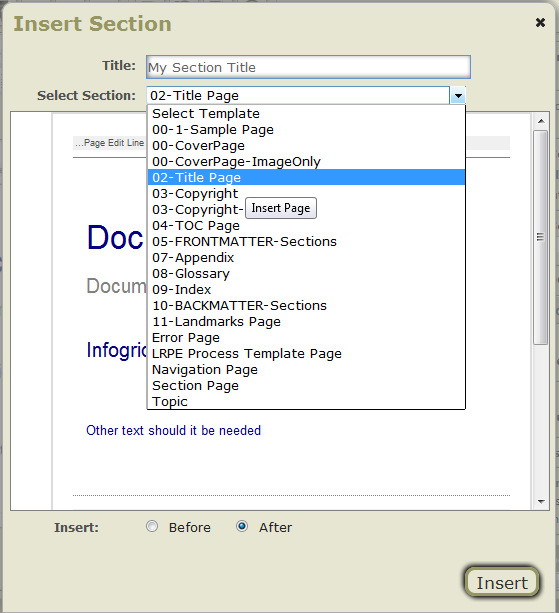
The Insert Section dialog contains a field where you enter the section title, a drop-down list to select the Section type, a preview of the section, and how you want it inserted (before or after the current section).
When you click the New Section button the Insert Section dialog opens.
This contains a list of document Section options provided from the active template. This may be different with different types of documents. The one shown here is the DPMaster-2012-1 template Section options which are very large and complete.
- You can select Section templates from the drop-down dialog. Some of these are specialist single pages, some of them are multi-section options (such as frontmatter, backmatter and specials).
- When you select a section template you get a preview of that template.
- Type in the name of the Section. This is very important. There will always be a default value. If you make a mistake you can use the Table of Content accordion tools to change it, or deleted the section and insert it again. This is the title that appears in the accordion Table of Contents, not the final page title which you type into the section in Writer.
- Select whether you want the section inserted before or after the section you are current using.
- Click the Insert button to instruct Writer to put the section in, or click on the X button in the top right corner to close the interface without any action.
- Your section will be updated in the accordion Table of Contents display and open for you to continue editing.
Configuring an Inserted Section
After you have inserted your section you need to make sure it has the correct properties.
Click on the block Block Control button to show the options. The Block Control button is is three vertical dots in the extreme top right corner of the section.

You can configure the type and/or behaviour of any section with the Flow Control tools. This screengrab shows the body-rw options in the default template.
You will immediately see the section flow control options for the template you are using.
Section Type: Some sections have multiple options on the section type. This includes the above example for body-rw sections. By default body-rw sections come with Chapter-rw selected (the most common book section), but it can be changed to any of the options by clicking on the pipe-delimited options.
Exclude: You can optionally choose to exclude this section from print or reader. The default auto option means it will be included in both print and reader output formats.
Profile Include: A section can be inserted for just one Design Profile. If it is left as auto it will appear in all design profiles. If you set it to a named profile it will only be included in that profile on format generation.
Section Flow: This applies to print PDF formats. If you need to force a page to open to the left or right, select the option. If you leave it at the open-auto default, the page will open left or right in the flow.
For more information on controlling and customizing the Section templates refer to the IGP:Digital Publisher Templates Technical Reference Manual.
Section History 
Every time you do any Save operation, a copy of the section is maintained in the section history. This can become quite large when working with documents intensively, especially if you are authoring documents directly in Writer.
Click on the Section History button. The Section History Report will open in the tools panel.
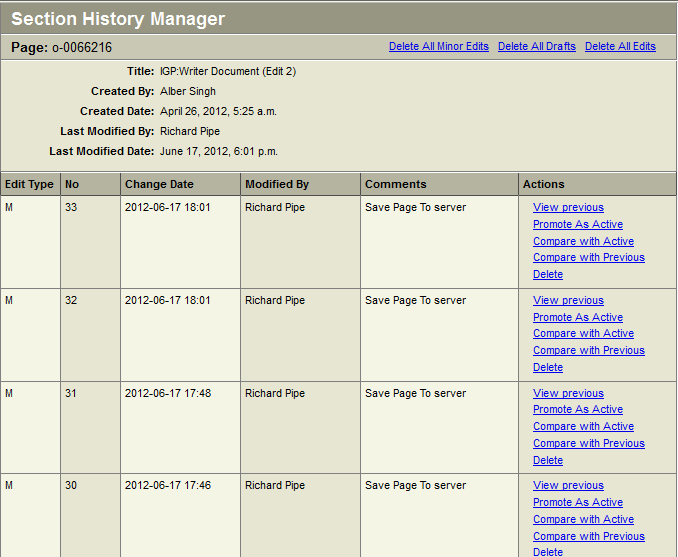
The Section History interface is an "Infinite undo" environment. You can view all revisions to a page and restore any one at any time.
The number of edit save operations can become very large during the drafting period, or during editorial and design phases as pages are opened and saved numerous times by multiple users. You can clean up revision history in a number of ways.
The Revision History columns
- Edit Type. You can tell the edit type from this letter. This will be M -Minor edit (Save and Continue), D- Draft, E-Edit, R-Revision. In this release of DP you will only see M.
- No. (Number) This is the accumulating count of the edit sequence.
- Change Date. This is the server date-time stamp in ISO format, when the save was made. The display has minute resolution.
- Modified By. This is the system name of the person carrying out the edit.
- Comments. This content will have auto inserted comments or user inserted comments when made. This release does not have a comments interface.
- Actions. Here you can do more with revision history to explore and understand changes. If you have made a mistake on a page, it is highly likely you can repair the damage from here.
- View Previous. In any revision item Actions menu, click View Previous.
- Promote as Active. In any revision item Actions menu, click Promote as Active. The active page and this page positions are swapped in the revision tree (the current active page is not lost).
- Compare with Active. In any revision item Actions menu, click Compare with Active. This changes the window and displays a comparison of the text of the this revision with the active page. Click Return to Page History Main Page to close the comparison view and return to the table view.
- Compare with Previous. In any revision item Actions menu, Click Compare With Previous. This changes the window and displays a comparison of the text of this revision with the revision immediately proceeding it. Click Return to Page History Main Page to close the comparison view and return to the table view.
- Delete. In any revision item Actions menu, Click Delete. The selected edit history item will be immediately deleted. This action cannot be undone. There is no audit record for Delete revision history.
- Delete all Revision History. Click Delete All Revision History to clean up the revision history table. Only the active version of the page will remain.
Delete Section 
Click the Delete Section button if you want to delete the current open section from your document.
A deleted page is not permanently deleted. It is moved to document deleted pages storage, where it will remain until the document is deleted or archived out.
Page revision history is permanently deleted at the same time a page is deleted, or migrated. Deleted sections are not included in a generated Archive Package.
If you want to remove a page from a document, and still be able to use it in the future, consider using the remix feature in Writer to move the page to another "cache" document before deleting the page.
- In the Writer Table of Contents accordion, open the Page you want to delete.
- From the Document Toolbar, click the Delete Page button. The Delete page dialog will open.
- You have the option to insert a comment explaining why the page is being deleted.
- Click the Delete button. The page will be deleted immediately.
- On completion of the page delete request, the Table of Contents page focus will move to the first page of the document.
- Click the X cancel button to close the dialog without deleting the page.
- You can now navigate to any page in the Table of Contents and continue working.
Delete All
The Delete All button is on the same dialog. This is useful when you want to keep the document (metadata, processing options, etc.) but delete all the sections. This is mostly used with file import. For example you import your manuscript and perhaps there is a styling error that means Chapters are not split correctly. You can delete all the pages, correct the manuscript styling and reimport the file.
When you click the Delete All button you will receive a final warning dialog. You can cancel of course but if you go ahead all pages are immediately deleted and only the document stub is left.
When you click Delete All the pages are not saved into Delete History.
Deleted Section History 
You can view sections that have been deleted by any person who has editing rights in the document. This maintains a record of the deleted page, who carried out the deletion, the date and time (from your server) and the reason the page was deleted if that was entered by the user when they were deleting the page.
It is good work practice to always insert a comment when working in a team collaboration environment.
- From the Document Toolbar, click the Delete Section History button.
- The Deleted Section History dialog box will open and display a list of the deleted pages.
- You can click the View button next to each item to view the contents of the deleted page. You can select and copy this information back into an active document section, but you cannot restore a deleted section.
- Click the Close button to dismiss the Deleted Page History dialog.