LEARN@IGP
6
Quickstart 2.Setting Up a Document
After you have imported you manuscript you will need to change the basic typographic layout of your document if you are generating a PDF. This is how to instantly change the main document layout properties such as page size, margins, fonts and line-height, indent settings and more. Updated: 2012-07-26
Overview
You can change the major layout properties of any document or book through the Document Setup panel in the IGP:Writer CSS Editor.
This allows you to change the page size, margins, and main typographic properties such as font-size, line-height, hyphenation rules and more.
You may also want to change the fonts applied to your document. This is done with the Font Schemes interface. We are assuming that the required Font Scheme is available.
For anyone with just a little experience with word-processors or typesetting the interface is easily understood. Once you are familiar with the behaviour you can make changes, save and instantly generate the PDF on your live content.
Of course this isn't the end of typography. There is still the tracking and other fine tuning to do with other tools.
Accessing the Document Setup Panel 

Click the Design Tools button to open the Design Toolbar.
From the Design Toolbar, click the CSS button. The CSS Editor will open in a new window.
From the top-left toolbar in the CSS Editor, click the Document button. The panel view will change to the document setup form.
Document Setup Panel
The Document Setup Panel lets you quickly setup the page layout
for your book or document.
The Document Setup Panel gives you quick access to all the main properties needed to comprehensively setup a reasonably complex trade or academic book to a defined typesetting specification.
When you open the interface for a book the first time it contains the template default settings. You can change them to your design requirements. When you click save the document CSS is updated.
The [F*] numbers in the blocks gives the FX classification value so you can quickly identify where the CSS changes are made when the Save button is clicked.
Setting Up a Book
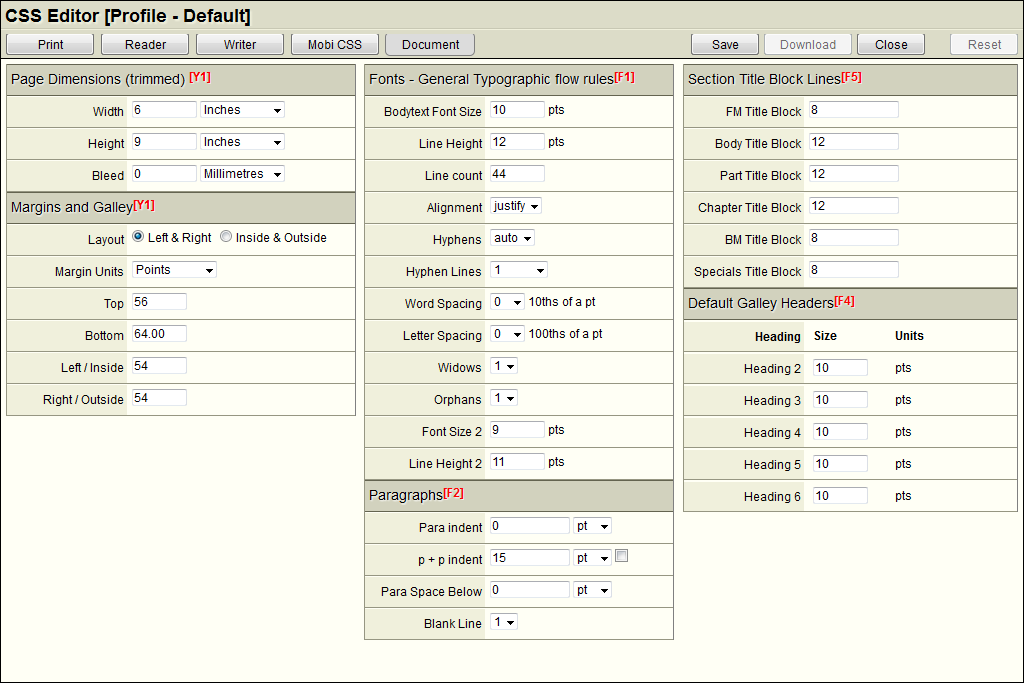
Page Dimensions
Page dimensions is usually the first values you will set unless the applied template already has the required values.
You can set the page height and width in Points, Picas, Centimetres, Millimetres, or Inches.
Bleed has the same dimension unit options. You only need to set bleed if your document has images that are bleeding outside margins. Otherwise leave it at zero (0).
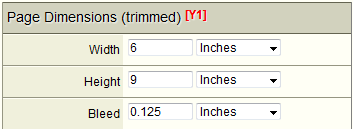
Margins and Galley
You can configure margins as Inside/Outside (standard for a book), or Left/Right (standard for manuals and other general documents).
You can set you margin units in Points, Picas, Centimetres, Millimetres or inches.
NOTE: You cannot set the bottom margin so do not try. You can only set the top and left/right or inside/outside margins.
The bottom margin is automatically calculated as you set the line-height and line-count in the General Typographic Rules form fields.
As you set the line-height and line count you will be able to see the bottom margin value changing as you type.
A Note On CSS Page Layout
In standard typesetting specifications the inside-margin and galley width values are given (typically in picas). With the CSS model all margins are set and the page width minus the left and right margins determines the galley width.
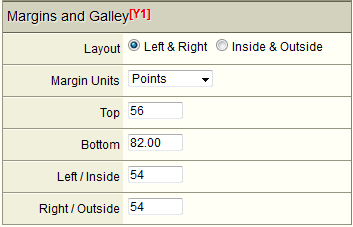
Fonts and Flow
In this block you set the primary flow values and behaviours for the document.
Bodytext Font Size. This must be set in points.
Line Height. This can only be set in points. Note that as you adjust line-height the margin bottom calculation is running. So in the Margins and Galley block you can see that you are getting a realistic page margin-bottom value. If you want a different bottom-margin, you will have to adjust the combination of margin-top, line-height and line-count.
Line count. This value is a simple integer. It is the number of lines on a full galley page.
Alignment. This can be set to Justify or Auto. When auto is set the content is ragged right.
Hyphens. This can be set to Auto or None. Hyphenation is applied for both justified and ragged-right text when set to Auto.
Hyphen Lines. You can set the maximum allowable consecutive hyphenated lines from 1 to five.
Word Spacing. Word spacing can be adjusted if your house style requires it. It will have no particular effect if you have set Alignment to Justify
Letter Spacing. Letter spacing can be adjusted if your house style requires it. It can be adjusted +/- 0.5pt in 5/100 point steps.
Widows. Set the allowed widow line count.
Orphans. Set the allowed orphan line count.
Font Size 2. A secondary font size can be set from this interface for sections such as references, notes and indexes if that is a required house style.
Line Height 2. A secondary line-height can be set to work with Font Size 2.
Paragraphs
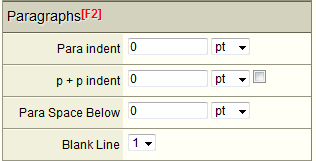
Setting Paragraph indents uses CSS properties and is setting that is different to normal layout rules.
Para indent. Typically you first set the paragraph indent to 0.
p + p indent. With the p + p property (a CSS pseudo-selector) set the text-indent requirement if a paragraph is following another paragraph. That means if a paragraph follows a title-block, heading or other block text it will not be indented.
Alternatively you do not have to use the CSS p + p method. Click the check box to turn this feature off. Now set the required paragraph indent in the Para indent field. The CSS contains context styles that will turn indenting off when paragraphs follow various blocks and lists.
Para Space Below. For technical documents where you don't want indents, you can set the p + p value off by clicking the check box. You then set the space below the paragraph to some appropriate value such as a half or full line-height to provide paragraph vertical spacing.
If your document needs page baselining this will have to be a full line height.
Blank Line. This sets the vertical height of the standard blank line in default line-heights. It is nearly always set to 1 line-height. However if you have a document with half-line spacing below, you may want to set this to a different value such as 0.5pt.
Section Title Blocks
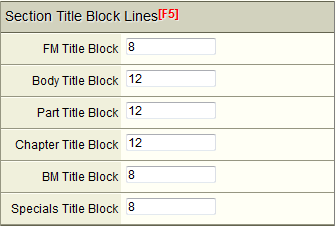
Title block heights are set in line-counts. Specifically that is multiples of the line-height you set in points in the F1 properties.
For example if you set 12pts for line height and 12 lines for the title-block, the title-block height will be 144pts.
Part and Chapter options are provided to make it easy to apply custom values for standard trade and academic books, or other books that use the Part/Chapter section pattern.
The Part Title Block height is also used for Unit Sections in the default templates. Text-book editors should be aware of this. These options can be customized.
The Body Title Block option is used for all other documents such as manuals, journal articles, textbooks, reference works and other document genres which in particular do not use the Part/Chapter section nomenclature.
Headings
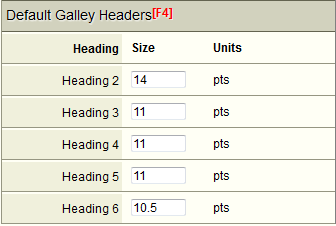
You can specify font sizes that do not exceed the top margin size and maintain the page baseline automatically.
Default heading margins and alignment are:
Heading 2 (h2 - A-Head) 2 lines above and 1 below, aligned center.
Heading 3 (h3 - B-Head) 1.5 lines above and 0.5 below, aligned center.
Heading 4 (h4 - C-Head) 1.5 lines above and 0.5 below, aligned center.
Heading 5 (h5 - D-Head) 1.5 lines above and 0.5 below, aligned left.
Heading 6 (h6 - E-Head) 1.5 lines above and 0.5 below, aligned left.
You can change these from the CSS Editor or IGP:Document Designer
FX uses HTML talk rather than arcane print typesetting talk. This is because IGP:Digital Publisher is a multi-format production environment and avoids using
The allocation of HTML headings as h1 for titles and h2-h6 for internal headings must be used consistently for all processors to work correctly.
Accessing Font Schemes 
To access font schemes:
- From the Section Toolbar click the Design Tools button. The Design Toolbar will open.
- Click the Font Scheme button. The available font schemes will be displayed in the Tool Panel.
- At this stage you will probably only want to apply the font scheme to Print.
- Click the Print button next to your preferred font-scheme.
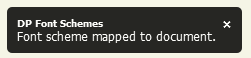
- When your font scheme has been applied you will see a dialogue confirming the action.
- The [Print] label will appear next to the selected Font Scheme.

You can now generate the PDF and see the new font scheme applied in your PDF.