LEARN@IGP IGP:Writer
10
The Page Toolbar
Interface
The Page Toolbar is the second toolbar down, and the tool icons are aligned left. The following tools are available in the Page Toolbar.
- Save and Continue
- Show Page History
- Setup Paragraph tracking and Flow
- Hide/Show Live Preview
- Process hard Linebreaks
- Paste Block
- Launch Table Editor
- Index Mode on/off
- Index term
- Hyperlink Targets
Save and Continue
This simple function allows you to send your page edits to the server without having to close the text editor.
Each time you click Save and Continue, a copy of the page text is saved in the Page Revision tree. It is annotated as a save and continue, the time the save was made and who made the save.
- You are in edit mode.
- On the Page Toolbar, click the Save and Continue button.
- The save operation will immediately start.
- Observe the message in the status bar. While the page is being saved it will message "Starting Save and Continue".
- When the page is saved the message will read "Page saved successfully." Normally this will take only a few seconds.
- You can now carry on with your writing, editing or flowing tasks.
Use this feature when you want to see a Page Preview PDF. Page Previews are picked up from the server, not from the text in your browser. Click Save and Continue. When you get the Page Saved... message, you can immediately click on the Page Preview PDF.
 Show Page History
Every time you do any save operation, a snapshot of your page is maintained in a page history. This can become quite large when working with documents intensively.
- From the Page Toolbar, click Show Page History. The Page History dialog will open.
- You can now use the Page History Tools to manage page revisions.
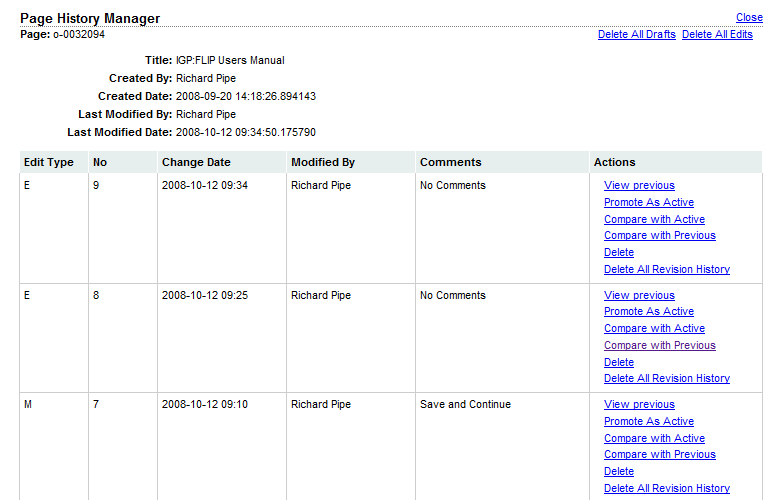
The Revision History Page
The number of edit save operations can become very large during the drafting period, or during editorial and design phases as pages are opened and saved numerous times by multiple users. You can clean up revision history in a number of ways.
- Close. Click Close to immediately close the the Revision History Page.
- Delete Minor Edits. Click Delete Minor Edits. All the (M) Save and Continue edit history pages will be immediately deleted and the edit history list refreshed to show the changes.
- Delete All Drafts. Click Delete All Drafts. All the (D) draft history pages will be immediately deleted and the edit history list refreshed to show the changes.
- Delete All Edits. Click Delete All Edits. All the (E) edit history pages will be immediately deleted and the edit history list refreshed to show the changes.
- There is no global Delete all Revisions. You must delete revisions one at a time.
The Revision History columns
- Edit Type. You can tell the edit type from this letter. This will be M -Minor edit (Save and Continue), D- Draft, E-Edit, R-Revision.
- No. (Number) This is the accumulating count of the edit sequence.
- Change Date. This is the server date-time stamp in ISO format, when the save was made. The display has minute resolution.
- Modified By. This is the system name of the person carrying out the edit.
- Comments. This content will have auto inserted comments or user inserted comments when made.
-
Actions. Here you can do more with revision history to explore and understand changes. If you have made a catastrophic mistake on a page, it is highly likely you can repair the damage from here.
- View Previous. In any revision item Actions menu, click View Previous.
- Promote as Active. In any revision item Actions menu, click Promote as Active. The active page and this page positions are swapped in the revision tree (the current active page is not lost).
- Compare with Active. In any revision item Actions menu, click Compare with Active. This changes the window and displays a comparison of the text of the this revision with the active page. Click Return to Page History Main Page to close the comparison view and return to the table view.
- Compare with Previous. In any revision item Actions menu, Click Compare With Previous. This changes the window and displays a comparison of the text of this revision with the revision immediately proceeding it. Click Return to Page History Main Page to close the comparison view and return to the table view.
- Delete. In any revision item Actions menu, Click Delete. The selected edit history item will be immediately deleted. This action cannot be undone. There is no audit record for Delete revision history.
- Delete all Revision History. Click Delete All Revision History to clean up the revision history table. Only the active version of the page will remain.
 Setup Page Flow Control
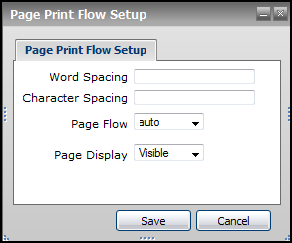
Applicability:
This option opens the current page of a document in IGP:Typography in the Browser. Refer to the IGP:Typography in the Browser User Manual to understand TIB better.
 Process Hard Linebreaks
When you copy a content from a PDF to a Writer Document, the page Breaks and Line Breaks from the PDF gets inherited. Highlight the text and click this option to process all the Line bReaks in the document.
 Paste Content Block
When you copy a Content Block it does not use the standard editor Copy, Cut and Paste memory, it has its own Copy memory. You can copy Blocks between pages while the application is open and running.
- In edit mode, select any Block from a page and on the Block Flow control bar, click Copy. The entire block is now on the Block Clipboard.
- Save Page or Cancel the page to close it.
- Use the TOC Menu to select the page where you want to copy the block.
- Click Edit Page.
- Click to place your cursor at the insertion point. It is recommended that this is done at the end of a paragraph.
- Click Paste Block. The block and all it's internal content, including images will be pasted. (Images may take a second or two to display depending on the speed of your network or Internet connection).
 Launch Table Editor
The Table Editor allows tables to be structured from paragraph or list content. One paragraph becomes one table cell. You must organize your content into a multiple of the rows and columns required for the table. If the table has empty cells, you must provide and empty paragraph.
 Index Mode On/Off
Indexing is an intensive and independent activity. When Index mode is turned on, all other editing functions on a page are disabled and only the Index Term button is active. This topic is specialist and is not covered in detail here.
 Index Term
When Index Mode is on you can select text and add it to the document Index. This topic is specialist and is not covered in detail here.
 Hyperlink Targets
Important. Before using the Hyperlink Targets tool make sure you have generated ID's using the Publishing Center.
- You can link to any ID referenced Block or item in a document.
- Highlight the text you wish to link (the pointer text)
- Click the Hyperlink Targets button. A new link navigation Window will open which will allow you to navigate through all ID structures in the whole document.
- Use the page navigation drop-down to select a target page.
- Scroll through any page until you find your link target.
- Click on the link ID in the left column.
- The Link Navigation window will close and the link from the pointer text to the target block will be created.