LEARN@IGP
7
Calibrating TIB
Setting up the document browser view
There is a set of numeric differences between the HTML Interface and the generated PDF due to the different resolution and measurement units of the two rendering environments.
The calibration interface allows you to simply adjust the HTML flow properties for a very close layout match of the HTML and PDF. It lets you obtain a near exact line-count and line-turn match between the two presentation environments.
Different fonts and font-sizes will require slightly different calibration settings.
This section has some technical details that are required for a clear understanding how the calibration settings affect the HTML presentation of the document.
CALIBRATION ONLY APPLIES TO THE HTML VIEW OF THE DOCUMENT IN THE TIB INTERFACE. IT DOES NOT HAVE ANY AFFECT ON THE PDF AT ALL.
All design properties that affect vertical flow must have been made before attempting to use TIB and calibration.
Technical Note
The calibration tools adjustments are very fine and are designed to compensate for minor floating point calculation differences.
Galley Width. Each unit of adjustment is 1 pixel, or 1.33 points.
Word Spacing. Each unit of adjustment is 1/100th of a point.
Character Spacing. Each unit of adjustment is 1/1000th of a point.
The Calibrate interface
This section assumes you have launched TIB and are in the TIB interface.
HTML view calibration must be carried out before any tracking or other flow adjustments are made on any document section.
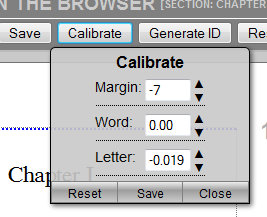
- From the Top Toolbar in TIB, click the Calibrate button to open the Calibration Dialog Box. Use this dialogue to set the default flow properties for your document.
- The interface has three primary tumbler adustments that can be made:
- Margin: Adjusts the margin width by pixels. This is normally set negative which reduces the width of the margins, and makes the text galley wider.
- Word: Adjusts the HTML presentation word spacing in 1/100th points.
- Lettter: Adjusts the HTML presentation letter spacing in 1/1000th points.
- There are three other buttons:
- Reset: Sets all calibration interface values to zero and applies them to the HTML page
- Save: Saves the calibration settings for this specific document and document profile.
- Close: Closes the calibration interface without making any changes.
How to use Calibrate
The purpose of the calibration procedure is to obtain as close a line count and line-end match as possible between the HTML view of the document and the PDF.Calibrate settings need to be checked and set on a per document per profile basis.The flow properties of any document will change substantially with a change of font. If you change your font settings you will have to reset and adjust Calibrate again.
Quick Calibrate Margin
- Check that hyphenation is on if your document is hyphenated.
- Maximum effect is gained by changing the Margin adjustment.
- Open a representative section (chapter) of your document. The first section may not always be appropriate, and a Longer section is preferrable to a short one.
- When the section is opened the HTML is displayed and the generated PDF is shown on the right.
- Scroll to the last page of the HTML file and PDF.
- Note the page number, generally the HTML view will be a half page or so longer than the PDF view. With some fonts and sizes it may be shorter, but the process is the same either way.
- If the page is longer, click the margin adjustment negative one pixel at a time. On a typical 10-30 page section, each click will result in a significant reflow and shortening of the HTML page.
- Observe the PDF last page line turn. You are using the margin setting to get as close a match to the PDF as possible.
- There may be a line or two difference.
- At this stage go to the Quick Calibrate Letter Spacing instructions, then come back for a final fine tune.
- After the Letter Spacing adjustment, check and make any final adjustments with the Margin values.
- Go to the first page and look at the page turn. It should be line for line with the PDF.
- Once you have practiced this a few times, Calibrate should take no more than a minute or two to complete.
- Don't forget to save your changes. Click on the Save button.
- You can save as often as you need to, each time changed values will be preserved.
Quick Calibrate Letter Spacing
- When you have the margin set to the right position find a relatively long paragraph, preferrably with longer words.
- Adjust the Letter spacing one digit at a time until you observe a reflow in the text. This usually occurs between -0.005 and -0.020 for most standard bodytext fonts. Do not go beyond the first adjustment jump.
- On some documents this will have no effect on line count, on some it can be significant.
- This adjustment compensates for the micro-layout differences at the character level due to the screen canvas resolution at 96dpi.
- Be conservative with this setting. Set it at the first significant ripple change you see in the text. If it is overused it will introduce inconsistencies in the letter kerning and primary flow.
Quick Calibrate Word Spacing
- Do not use this adjustment on justified, hyphenated documents. It has no value in the calibration context where the justification algorithm is modifying word spacing.
- With left-aligned, right-aligned documents, if there is a small line-end mismatch this can be used to get exact line end matches following the Letter Spacing Quick Calibrate message.
- Remember to always use the minimum adjustment possible. This only affects the HTML presentation it does not affect the PDF output.