LEARN@IGP IGP:Digital Publisher Management
11
Projects
Main | Administration | Projects
- Create a new Project
- To Start
- To create a new project
- Details of the Add New Project form
- View list of documents in a Project
- To Start
- To view the list of documents of a project
- Create a new document under a Project
- To Start
- To create a new document under a Project
- Import an archive document under a project
- To Start
- To import an archive document under a project
- Control Users of a Project
- To Start
- To control users of a project
- Delete a Project
- To Start
- To delete a project
Create a new Project
To Start
- You must have administrative privileges to control Projects.
- From the Main Page, click Projects under the Administration section. This action will transfer you to the Projects Screen.
- The Projects Screen displays a filter bar to sort projects by name, tasks or date and the list of existing projects along with a short description and detail of each.
To create a new project
- From the top right toolbar, click New project to add a new project.
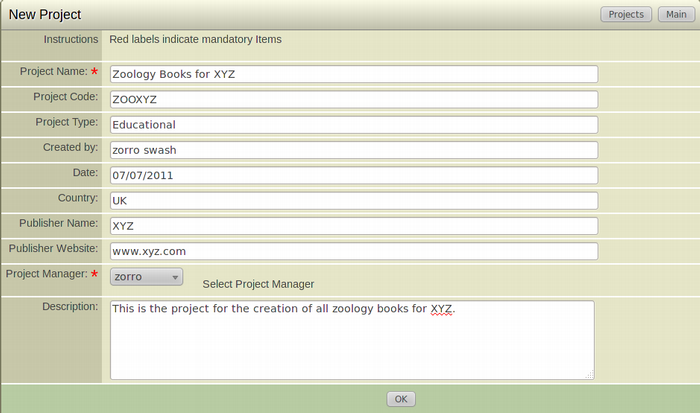
- The Add New Project form will appear.
- Fill in the blank fields.
- Click Save, to add the new project.
- To close the form without adding a new project, click Cancel. This action will take you back to the Administration-Projects page.
Details of the Add New Project form
-
Project Name: Assign a name for the new project you are creating. This is a mandatory field.
The Project name is permanent and cannot be modified once it is saved. - Project Code: Enter a Project Code for the project.
- Project Type: Enter the type of the project.
- Created By: Enter the name of the creator of the project.
- Date: Enter the date when the project was created.
- Country: Enter the name of the country where the project is based.
- Publisher Name: Enter the name of the publisher of the project.
- Publisher Website: Enter the website URL of the publisher of the project.
- Project Manager: From the list of available users in the Dropdown menu, select the user who you want to assign as the Project Manager. This is a mandatory field.
- Description: Enter a short paragraph describing the project.
View list of documents in a Project
To Start
- You must have administrative privileges to control Projects.
- From the Main Page, click Projects under the Administration section. This action will transfer you to the Projects Screen.
- The Projects Screen displays a filter bar to sort projects by name, tasks or date and the list of existing projects along with a short description and detail of each.
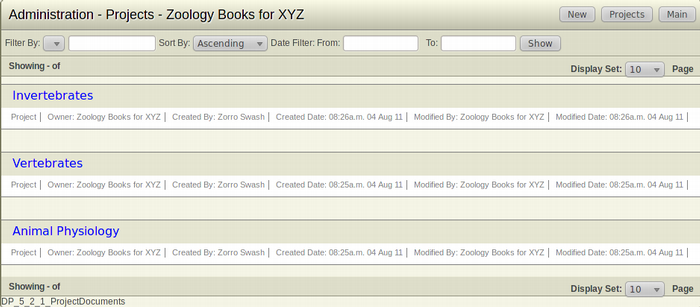
To view the list of documents of a project
- Browse for the Project of which you want to view the document lists.
- After finding the particular project, click on the name of the project.
- The Option Bar of the document will appear below the Project name.
- From the list of options, click on Go to documents.
- The list of documents under the particular project will appear on a new page.
Create a new document under a Project
To Start
- You must have administrative privileges to control Projects.
- From the Main Page, click Projects under the Administration section. This action will transfer you to the Projects Screen.
- The Projects Screen displays a filter bar to sort projects by name, tasks or date and the list of existing projects along with a short description and detail of each.
- Browse for the Project where you want to add a document.
- After finding the particular project, click on the name of the project.
- The Option Bar of the document will appear below the Project name.
- From the list of options, click on Go to documents.
- The list of documents under the particular project will appear on a new page.
To create a new document under a Project
- From the top right toolbar, click New Document to add a new document under the particular project.
- The Add New Document form will appear.
- Fill in the blank fields.
- Click Save, to add the new document.
- To close the form without adding a new document, click Cancel. This action will take you back to the Administration-Projects page.
Import an archive document under a project

To Start
- You must have administrative privileges to control Projects.
- From the Main Page, click Projects under the Administration section. This action will transfer you to the Projects Screen.
- The Projects Screen displays a filter bar to sort projects by name, tasks or date and the list of existing projects along with a short description and detail of each.
- Browse for the Project of which you want to view the document lists.
- After finding the particular project, click on the name of the project.
- The Option Bar of the document will appear below the Project name.
- From the list of options, click on Go to documents.
- The list of documents under the particular project will appear on a new page.
To import an archive document under a project
- From the top right toolbar, click New to import an archive package.
- The Add New Document form will appear.
- Click the Browse button in the Import Digital Publisher Archive Document section.
- Search for the Digital Publisher archive document in your local system and click OK.
- The archive document will be a part of the particular project.
Control Users of a Project
To Start
- You must have administrative privileges to control users of a Projects.
- From the Main Page, click Projects under the Administration section. This action will transfer you to the Projects Screen.
- The Projects Screen displays a filter bar to sort projects by name, tasks or date and the list of existing projects along with a short description and detail of each.
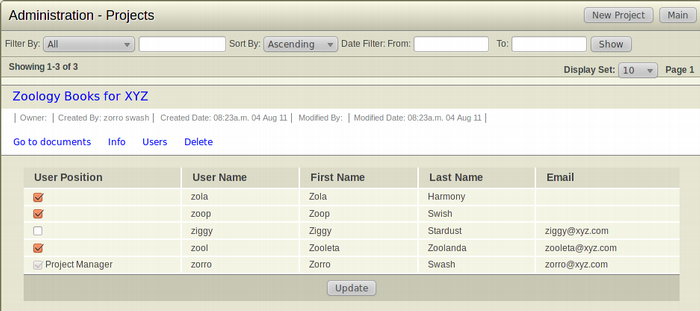
To control users of a project
- Browse for the Project of which you want to control the users.
- After finding the particular project, click on the name of the project.
- From the list of options, click on Users.
- A screen showing the lists of users in the project can be seen. Here, you can control the access and privileges of the users of the project.
- Select the Checkbox of the particular users you want to activate or add in the project.
- Click Update to update the accessibilty and privileges of the users.
Delete a Project
To Start
- You must have administrative privileges to control users of a Projects.
- From the Main Page, click Projects under the Administration section. This action will transfer you to the Projects Screen.
- The Projects Screen displays a filter bar to sort projects by name, tasks or date and the list of existing projects along with a short description and detail of each.
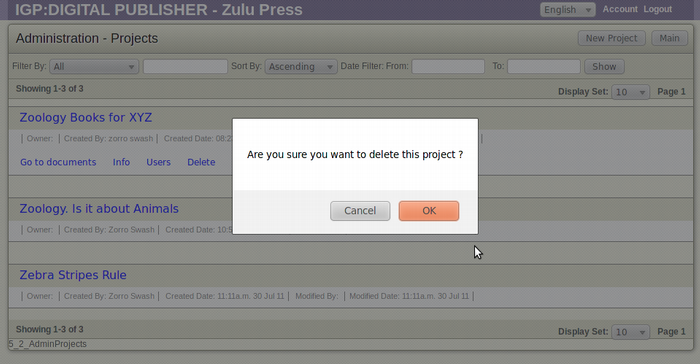
To delete a project
- Browse for the Project you want to delete.
- After finding the particular project to delete, click on the name of the project.
- From the list of options, click on Delete.
- The Confirmation Dialog Box will appear on your screen.
- To confirm the deletion of the user, click OK.
- If you don't want to delete the user, Click Cancel.
Note: All documents of the deleted project are moved to the Maintenance Delete Library. All other references are directly deleted.