LEARN@IGP IGP:Distribution Manager

26
Configure Distribution Channels Set-up
Main | Global Tools | Distribution Channels - Metadata
- Edit Channel custom rules
- To Start
- To edit Channel custom rules
- Details of the Configure Distribution Channels-Setup form
- Channel Active
- Channel Information
- Transfer Information
- Distribution Schedules
- On Sales Date
- Distribution channel Contact Details
- Publisher contact details
- Other Notification Details
- Aggregate Distribution
Selecting your distribution channel preferences and configuring those channels is an important operation that must be done carefully and correctly. There are two main parts to this configuration:
- Configuring the metadata and communication options.
- Configuring any custom pricing options you may want to apply to a channel.
Edit Channel custom rules
To Start
- From the Main Page, click the Global Tools button.

- In the Global Tools page, click Distribution Channels.

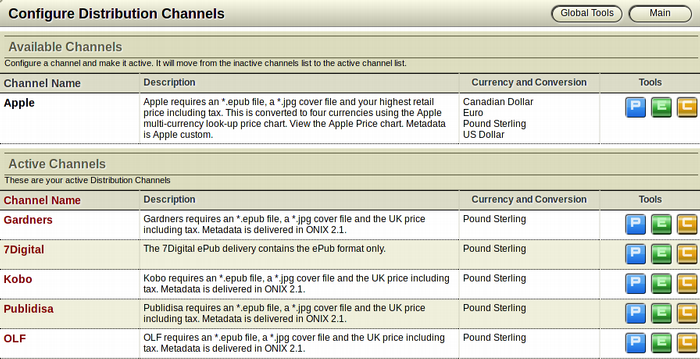
- The Configure Distribution Channels page showing a list of Distribution Channels will appear on the screen.
- The Distribution Channels are divided into 2 sections- Available Channels and Active Channels. The top part of the screen shows the list of available Distribution Channels which are not active. Below it are the list of active Distribution channels.
- This page also shows the channel name, a short description of the channel as well as the currency and conversion information.
To edit Channel custom rules
- In the Configure Distribution Channels page, browse for the Distribution Channel for which you want to edit the custom rules.
- After finding the channel you want to edit, click the
 Channel Custom Rules (Green) button from the Tools section of the channel. This button has the Letter E on it.
- The Configure Distribution Channels-Setup form will appear on the screen.
-
Make the necessary modifications you want and click
 Save to edit the Distribution Channel.
-
Click Cancel to go back to the Configure Distribution
 Channels page without saving the new custom rules for the particular channel.
Details of the Configure Distribution Channels-Setup form
Highlighted fields are mandatory fields.
The Screengrab of the form has been divided into segments.
Channel Active
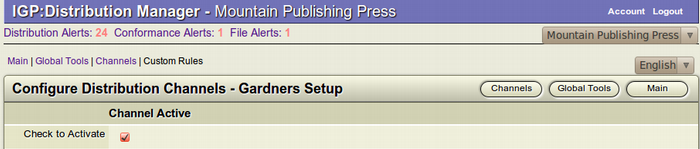
Select the Checkbox to make the channel active. When you make a channel active, books will be distributed to that Channel from the next scheduled distribution event.
IMPORTANT: Do not make the channel active until all configuration items have been completed.
Channel Information

- Channel Code: Enter the standard code that you have specified for the channel.
- Channel Account Name: Enter the name of the account for the channel. The channel account name will be in the ONIX file.
Transfer Information
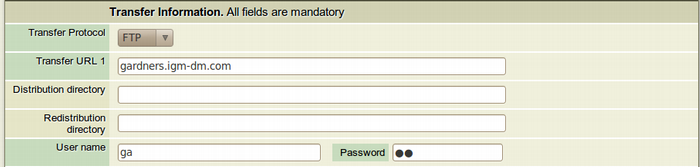
- Transfer protocol: (Mandatory) Select the type of file transfer that you want to enable from the list in the Dropdown menu.
- Transfer URL: (Mandatory) Enter the URL address of the Channel where the files will be transferred. eg. overdrive.igp-dm.com.
- Distribution Directory: (Optional) If the Distribution Channel requires files to be placed into a subdirectory in the ftp location, specify the directory path here.
- Redistribution Directory: (Optional) If the Distribution Channel requires redistribution events to be sent to a different folder. Set the path here.
- User name: (Mandatory) Enter the User name of the Distribution Channel.
- Password: (Mandatory) Enter the Password of the Distribution Channel.
Distribution Schedules

You can set custom schedules for each Distribution Channel or use the System defaults that are set by the maintainer.
- Auto Distribute: (Optional) Select the Checkbox to enable Auto-distribution to a Channel. This means you don't have to take any action to distribute books. If the metadata is correct and all files are uploaded, distribution events will occur on the next scheduled event. If you don't select this option you will have to manually trigger distribution events from the Status, Distribution Alerts screen.
On Sales Date

On Sales Date is the date when a new product can be placed on sale by retailers (Distribution Channels) in the market served by the supplier (Publisher).
A publisher can control the date on which a particular distribution channel receives its products before the On Sales Date. A publisher can configure each distribution channel and specify the date of delivery to the channel before the books can be placed on sale to the end consumer by the channel.
To specify the delivery date of a channel, click the dropdown menu and select the number of days for distribution before the On Sales date.
This means, if you selected 5 in the dropdown menu, the product will be delivered to the channel, 5 days before the On Sale Date.
You can withold the distribution of products to a particular channel till the last day before the On Sale Date.
If the embargo date is specified as None, the channel will receive the products on the day the publisher uploads it. But this does not mean that they can start the sale of the product from the day itself or before the On Sales Date.
Distribution channel Contact Details

- Contact Name: (Mandatory) If this channel has a contact person you can put their name in here.
- Contact e-Mail: (Mandatory) When you create your account you will be given an email address to put in your ONIX header. Enter that here.
- Contact Phone (office): (Mandatory) Enter the Office Phone number of the distribution Channel.
- Delivery Notification: (Optional) This activates Email notification to a Distribution Channel Partner. Note that some channels such as Amazon do not require notification.
Publisher contact details

This form is auto filled from the Account Configuration, Publisher ONIX Information form. You don't have to enter details here unless you need to change them for a specific Distribution Channel.
- Contact Name: (Mandatory) This is normally the person in your organization who is responsible for distribution activities. This name will appear on each ONIX file that is distributed.
- Contact e-Mail: (Mandatory) Enter the Email address of the contact person who will receive delivery notification emails. Distribution channels will respond with this email address when files are submitted.
- Contact Phone (office): (Mandatory) Enter your Office Phone number or a specific contact number if preferred. Channels seldom contact anybody using this number.
- Delivery Notification: (Optional) Select the Checkbox to activate Email notification to your contact email and other notification email addresses.
Other Notification Details

These are optional fields if there are other people in your organization who need to be notified about distribution events as they occur.
- To: Enter the Email address of the person you want to notify. To enter multiple Email addresses, separate them with commas.
- Cc: Enter the Email address of the person you want to send a Cc (carbon copy) of the same notification. To enter multiple Email addresses, separate them with commas.
Aggregate Distribution

- Aggregate: Select the checkbox for single channel with multi publisher distribution.