LEARN@IGP
28
eIndexing Tools
How to create a dynamic eIndexes for print, ebooks and websites using the eIndexing tools Updated: 2013-04-08
Overview
You can create complete indexes for print and eBooks with the e-Index Tool.You can create a comprehensive, detailed guide to the information in your book. You can create only one index for a document or book. To create an index, you first place index markers in the text and then associate each index marker with the index entry that you want to appear in the index.
Your index is built interactively in real time.
You will not see page numbers until you generate a full document PDF. When you PDF generate the index, each topic is listed, along with the page on which it was found. The index terms are sorted alphabetically, typically under section headings (A, B, C, and so on). An index entry consists of a term (the term readers look up) paired with either a page reference (page number or range) or a cross-reference. A cross-reference, preceded by “See” or “See also,” points the reader to other entries in the index, rather than to a page number.
When you generate an eBook Index there are no page numbers. The markers are interactive and can be left as symbols or processed to occurence sequence numbers. They can also be processed to alphabetic grouping sections to make navigating a large index in an ebook easier.
Before you start
You must have a correctly formatted e-Index page in the backmatter of your document. The default template available from the Sections dialog contains all alphabetical sections and a numerical section by default.
NOTE: If you try and carry out indexing without a correct Index Section template the Indexer will not work.
NOTE: You can only have one Index. If you have two index sections in the document the application will behave erratically.
Inserting an e-Index Page
To insert an e-Index page in your document:
- From the Table of Contents navigate to the section before your Index insertion position.
- Click Section Tools. The Section Toolbar will open.
- Click the New Section button. The Insert Section panel will open.
- From the Select Section dropdown selector locate and click e-Index. Wait for it to load in the preview viewport.
- To insert the Index page after the currently selected TOC page, on the panel make sure the After option is selected and click the Insert button.
- The eIndex page complete with all default template items will be inserted into the document.
Starting the eIndexer
- From the Document Toolbar click the Linking and Index Tools button.
- Click the Turn on Index Mode button. The Tool panel will change to the empty e-Index Editor the first time it is used. As you use the e-Indexer the interface will show the Index in its current state as it is being created.
- If there is no Index section in the document this will show the message "Indexer could not be loaded. No Index section found in the document."
Understanding the eIndex Interface
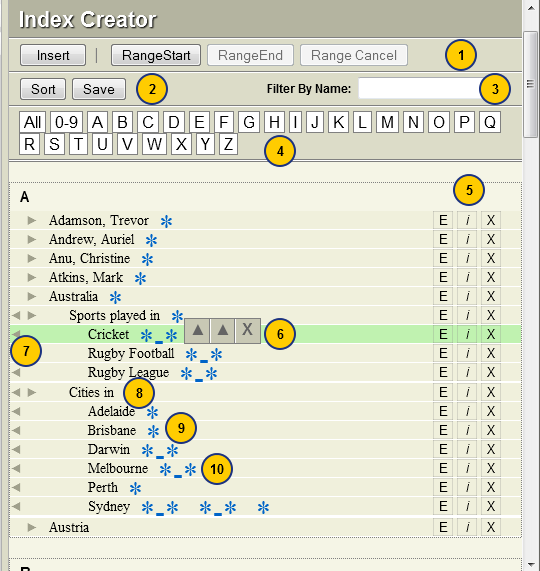
Here is a screengrab of the e-Index interface with some terms and markers. These are explained in greater depth below.
1. The Insert term toolbar. This is used to insert empty terms and items, referenced terms or range terms and items.
2. Sort and Save buttons. Sort alphabetizes at the root or sub-term level. Save updates the Index page.
3. Filter to an exact Index term using a taxonomic reducing list.
4. Quick navigation to a letter group. Use All to restore the full index list.
5. Edit, Italicize or Delete a term.
6. Navigate to a term marker in the text and/or delete a term marker.
7. Change the nesting of a term. This version supports three levels of nesting.
8. Showing an empty root term with no marker.
9. Showing a term with a marker.
10. Showing a term with range start and end item markers.
Using the Indexer
There are three main indexing actions. You can insert the following at the root, sub-term or sub-sub-term level.
- Empty Term. An empty index term (topic) with no marker in the text.
- Term item. A single selected index term and linking marker in the text.
- Term Range. A selected range index term range start and end marker as a root, sub-index or sub-sub-index term.
The insertion actions you can use are:
Insert Button. Directly enter a root term with no marker into its alphabetical section. You must ensure no text is selected when you do this.
Select-text-Insert Button. Highlight text in writer and click the Insert button. The text will be inserted as a root term with a marker in its alphabetic position.
Select-text-highlight term-double-click. The selected text will be inserted as a sub-term with a marker of the highlighted term with a term item.
Select-text, highlight term and Ctrl-double Click. The selected text will be insert as a term marker.
Indexing actions
This is an indexing action summary table. The actions are detailed below.
| To | Select | Action | Inserted |
|---|---|---|---|
| Create an empty root term | Nothing | Click Insert Button and enter term text | Term is inserted alphabetically into the root. |
| Create an empty sub-term | Nothing | Highlight root term, click Insert button and enter term text | Term is inserted under the selected term and can be turned into a sub-term |
| Create an empty sub-sub-term | Nothing | Hightlight target sub-term, click Insert button and enter term text | Term is inserted under the selected sub-term and can be turned into a sub-sub-term |
| Create a root term with an item reference | Select text reference in Writer | Click Insert | Term inserted into alphabetic root with a * item reference. Use Sort button to alphabetize. |
| Create a sub-term with an item reference | Select text reference in Writer | Double-click the parent root term | Sub-term is inserted with a * sequentially under the highlighted term. Use Sort button to alphabetize. |
| Create a sub-sub-term with an item reference | Select text reference in Writer | Double Click on the target sub-term | Sub-sub-term is inserted with a * sequentially under the double-clicked sub term. Use Sort button to alphabetize. |
| Add an item reference to a term (any nesting) | Select text reference in Writer | Hold Ctrl Key and double-click on target Index item | Inserts term item * into the double-clicked term. |
| Add root term range markers | 1. Select text at the start of the range | Click Range Start | Nothing happens |
| 2. Select text at the end of the range | Click Range End | The term with range markers will be inserted into its alphabetic position in the root. | |
| Add sub-term range markers | As previous | Highlight term for which it will be a child | The term with range markers will be inserted as a child of the highlighted term. |
| Add a marker range to a term | As previous | Hold the Ctrl key when clicking Range End | The term with range markers will be inserted into the highlighted terms. |
Inserting Empty Terms
You can insert an empty term (topic) in any level as long as there is a parent level container.
Root term without Marker
- Click the Insert button. A text-entry dialog will open.
- Type in the term and click OK.
- The term will be inserted into the Index in alphabetic position.
Sub-term without Marker
- Click on the target Root term within which you want to place a sub-term.
- Click the Insert button. A text dialog will open.
- Type in the term and click OK.
- The new unlinked term will be inserted at the same level as the selected term.
- Use the term depth arrows to position the term as a sub-term.
Sub-sub-term without Marker
You can use the filter or letter navigation to move quickly to any term (see using filters below).
- Highlight the target Sub-term.
- Click the Insert button. A text dialog will open.
- Type in the term and and click OK.
- The new term will be inserted at the same level as the selected sub-term.
- Use the term depth arrows to position the term as a sub-sub-term.
Inserting Terms with Markers
- Select the required text from the Writer panel.
- Click the Insert button.
- The term will be inserted into the root of the index with a marker or added as a marker * if the term already exists with an exact alphabetic match.
You do not have to select entire words or phrases. You are creating an Index term-reference position marker. The actual text does not matter as it can be edited and sorted in the e-Index interface.
Inserting Sub-terms with Markers
- Select the required text from the Writer panel.
- Double-click on the parent term.
- The term will be inserted with a marker as a child of the term you double click.
- To insert a marker into a term hold the Ctrl key as you double click the parent term.
Navigating Index Markers
You can navigate to any marker in your text to check the content position or for any other reason.
- Click the Marker asterisk *. This will show the Marker toolbar.
- Click the Marker Goto button. This will open the section and navigate exactly to the selected Marker's position in your document.
- With Range Markers you can navigate separately to the Start or End marker. There are two buttons. Click the left Goto button to navigate to the range start marker and the right Goto button to navigate to the range end marker.
To be completed