LEARN@IGP
16
Find and Replace
Find and Replace lets you doing proofing corrections across the whole document, a section, or even target a content block structure. Additionally you can also replace and insert new attribute/values using this tool. Updated: 2014-09-10
Overview
Text Find and Replace is a powerful editing tool that makes it easy to work with proofing edit changes on a document. It allows the searching for any text string, including all unicode characters, punctuation and "invisible: characters such as non-breaking spaces and others.
It can be configured to find content across the whole document, section groups such as frontmatter, backmatter and body, or just the current section.
In addition the find action can be confined to named content blocks. For example title-block.
Text Find and Replace is a two step process:
- Find text. The text is highlighted with a familiar delete and insert pair. Eg: findreplace.
- Evaluate and accept or reject changes. Traverse the document inspecting the changes, or globally accept or reject the changes.
You can only use Find and Replace if you are the only user in the document. If you try to do a find/replace operation and other editors have sections locked, the application will NOT carry out the edit. You will get a message that sections are locked by other users.
Using Find and Replace 

Click on the Editing Tools button. From the Editing Toolbar click the Find & Replace button. Find and Replace will open in the tools panel.
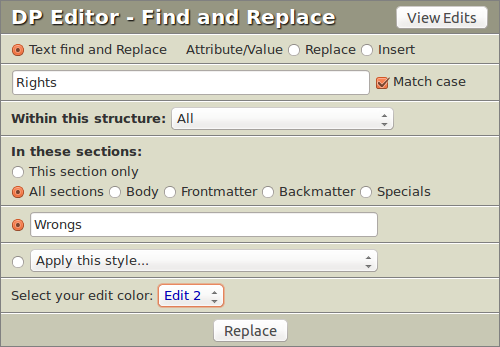
You will see this interface when you open Find and Replace. In this example we are finding "Rights" and replacing it with "Wrongs" in the Universal Declaration of Human Rights.
You will see this interface when you open Find and Replace. In this example we are finding "Rights" and replacing it with "Wrongs" in the Universal Declaration of Human Rights.
- Enter your required text in the find text field.
- Select the structure and sections. The default is This section only.
- Enter your required replacement text in the Replace with this text... field.
- Optionally select a style to be applied to the replaced text. This can be bold, italic or underline.
- Select your edit colour. There are six options.
- When you are sure you have the correct text and settings, click the Replace button.
The tool will now process the selected structures and sections of your document with your changes. If this is being applied to a whole document it may take a second or two.
Review your edits
From the topbar click the View Edits button. The form will change to the Replace Viewer. The count of changes made can be seen in the topbar.
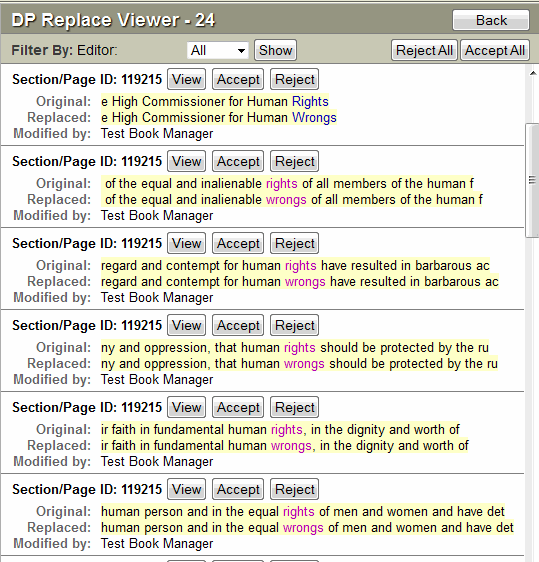
There were 24 replacements made in the document. The changes can be seen in the Replace Viewer and individually accepted or rejected.
- All the edits are listed in document sequence. With a short string of the previous and changed text one above the other. You can review this list.
- View. If you want to see an edit in the section context click the View button. This will navigate to the section and show the edit at the top of the Writer panel.
- You can view all edits, or choose just a single color of edits by selecting from the Editor dropdown.
- Accept. You can accept an individual edit by clicking the Accept button.
- Reject. You can reject an individual edit by clicking the Reject button.
- You can accept or reject all changes.
- From the top toolbar click the Accept All button. The processor will remove the highlighting and leave the inserted replace text.
- From the top toolbar click the Reject All button. The processor will remove the highlighting and leave the original find text.
General Guidelines
- You can find characters, words and phrases. This includes punctuation and spaces.
- You can cut and paste characters and strings from the Writer document.
- You cannot work across paragraph boundaries. All find actions must be within a paragraph.
- Find operations that act across styles will not execute.
- If you want to isolate a word place spaces before and after in both the find and replace text fields.
- There are no wildcard options in this version. It only finds complete strings.
- You can find characters and replace them with nothing.
Find and Replace- Attribute/Value
Using the Attribute/Value option you can easily replace the exisiting Attribute/Value with a new Attribute/Value in a particular section or across the whole document. Additionally you can insert a new Attribute/Value in a particular section or across the whole document.
Two separate options are available here which can be used individually depending upon your requirement or work-flow. The two options available are:
- Replace
- Insert
Each of these options are explained below.
Attribute/Value- Replace
You must use this option to replace the existing Attribute/Value with a new Attribute/Value. This replacement can be handled in the section that you are currently working in, across all the sections of your document, Body sections, Frontmatter sections, Backmatter sections and Specials depending upon the requirement.
Here are the steps you must follow when replacing an existing Attribute/Value.
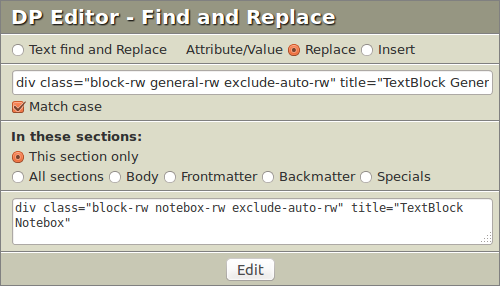
In this case we have used an example of replacing
div class="block-rw general-rw exclude-auto-rw" title="TextBlock General"
With
div class="block-rw notebox-rw exclude-auto-rw" title="TextBlock Notebox"
To Start
Attribute/Value-Replace
Make sure the radio button Replace is selected against the Attribute/Value option.
Enter Attribute/Value, that you want to find; in the Find input field.
Example
div class="block-rw general-rw exclude-auto-rw" title="TextBlock General"
The option Match Case will be selected by default. You can un-check this option as per your needs.
The next step is to select the sections where the Attribute/Class must be changed. The option "This section only" is the default selection. However you can select other options such as All sections, Body etc depending on your requirements.
After you have selected which sections should the Attribute/Class be replaced in; you must
then enter the new Attribute/Class information in the Replace Attribute/Value input field.
Example
div class="block-rw notebox-rw exclude-auto-rw" title="TextBlock Notebox"
Click the Edit button to complete the replacement process.
There will be a confirmation message that will be displayed once the process is completed. You can the navigate through section(s) of your document to check the successfully replaced Attribute/Value.
Following the above steps you can replace the exisiting Attribute/Value in a particular sections or across all sections of your document.
Attribute/Value- Insert
The insert option can be used to add an additional class to an existing Attribute/Value.
To explain this we have used the following Example
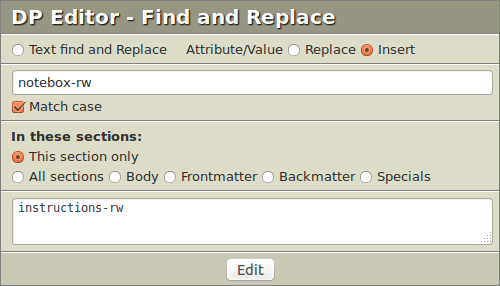
In a situation where you want to insert an additional class "instructions-rw" to an existing "notebox-rw" block across the entire section you are working in or All sections, Body,Frontmatter, Backmatter and Specials. This will depend on your requirement.
To Start
Attribute/Value-Insert
Make sure the radio button Insert is selected against Attribute/Value option.
Enter Attribute/Value that you want to find; in the Find Attribute/Value input field.
Example:
"notebox-rw"
The option Match Case is selected by default. You can choose to un-check this option as per your needs.
The next step is to select the sections where the Attribute/Class must be changed. The option "This section only" is the default selection.
Once you have filled in all the required fields and selected the sections as per your requirements you must enter the insert attribute in the Insert Attribute/Value input field.
Example:
"instructions-rw"
Click the Edit button available here to complete the insertion process.
There will be a confirmation message that will be displayed once this process is completed.
Once the changes are made the newly inserted Attribute/Value will appear as below.
Example:
"notebox-rw instructions-rw"
Following the above steps you can insert a new Attribute/Value inside an existing Attribute/Value in a particular sections or across all the sections of your document.