LEARN@IGP IGP:Writer
17
Creating a New IGP:Digital Publisher Document
How to
Topic Overview
This topic covers creating a new IGP:Digital Publisher document and using the options associated with creating a new document and adding section content to existing documents.
Any user with a My Reader Writer dashboard option can create a new document at any time. The following available methods to create a new IGP:Digital Publisher document and/or add content are explained.
- Creating a new document using the New Document form.
- Use the New Document form. Setup a clean document with the template components you specify.
- Copy an existing document. This is useful where documents are under edition or revision control separate to the RW internal revision tree system.
- Import a manuscript file
- Remix from IGP:Reader
Introduction
IGP:Digital Publisher is a template driven document environment. Every document must use a presentation template for its design and layout rules.
Therefore a template must exist for a document to be created. IGP:Digital Publisher comes with a number of standard templates ready for instant use. You can create your own templates (CSS programming skills required) and import templates from Infogrid Pacific and other third parties.
Creating a New Document Using the New Document Form
New Documents form is available under Private Documents of the user as well as under the Project context.
- From the Private Documents or the Projects page screen, click New Document in the right toolbar. The Create New Document form will open.
- Minimum Mandatory Metadata. You must give the document a Title as the minimum metadata requirement. You can create a default document with no other metadata. However the metadata you put here is used to update the book metadata and Catalog Item metadata.
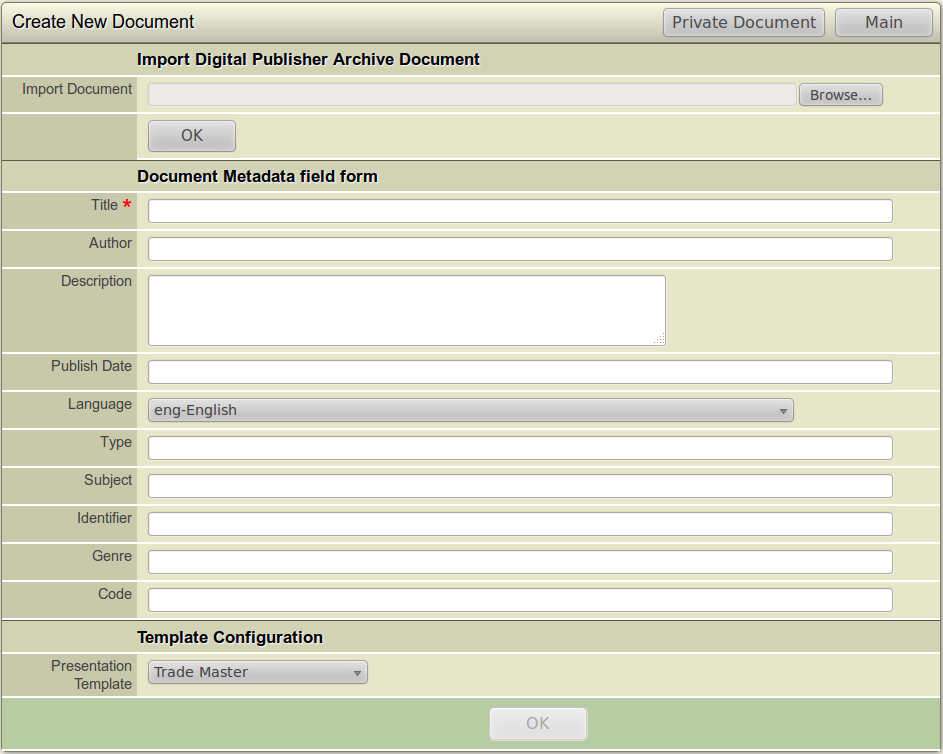
The New Writer Document Form
- Fill in the descriptive metadata fields with enough information to assist you and others to easily understand the content and purpose of document from the displayed metadata. You can modify and change metadata at any time, so when creating a new document just include enough information to enable you and others to use the Catalog filters to find the document.
- Title: This is the only mandatory field.
- Author: This means author, chief editor or the organization creating the document.
- Description: A brief description of the document can be given in this field.
- Publish Date: Enter the Publish date/year of the document.
- Language: Enter the language of the document.
- Type: Enter the type of the document. A document type can be text, images, audio/video, interactive etc.
- Subject. Subject can be entered from the keyboard or from a controlled Vocabulary if configured and available. It is useful to have an agreed taxonomy of subjects, and/or genres defined to make it easy to filter IGP:Digital Publisher catalog items as required.
- Identifier: Enter the book identifier of the document if available.
- Genre: Enter the genre of the document. EG. User Manuals, Business Books, trade Books etc.
- Code: Enter the code of the book. It is useful to have an agreed taxonomy of the codes of particular book titles to make it easy to filter from the IGP:Digital Publisher catalog items as required.
- Presentation Template: Select a presentation template. Trade Master template is the Default template.
- Click OK. The screen will refresh and a "Document Created"mesage will be displayed on top.
- Your new document is now available and you can now proceed to edit or otherwise work with the document.
Creating a new document using the Import Archive method

You can create a new document by importing a DP Archive package in IGP:Digital Publisher Manager. DP Archive Packages are ZIP files and needs to be generated first. You can generate an Archive package of an existing document by Clicking the Generate Formats button in IGP:Writer.
To Create a new document using the Import Archive method
- You must log in to IGP:Digital Publisher Manager.
- From the Private Documents or the Projects page screen, click New Document in the right toolbar. The Create New Document form will open.
- The Create New Document form displays two ways of creating a new document.
- Import an archive document
- Create a new document manually
- From the Import Digital Publisher Archive section, click the Browse button.
- Browse for the DP Archive (ZIP) package you want to import in your local system.
- After the correct file is selected, click the OK button below the section. The application will upload and process your new document. This may take some time depending on the size of your document. For example, a 20 chapter 300 page novel may take around two minutes, so be patient.
- When importing is complete the Create new Document Form will display a "Digital Publisher Archive Document Import Success" message. If the upload fails due to any reason like Wrong FIle, the screen will display "Digital Publisher Archive Document Import Failed" message.
- After a successful import, you can now click on Edit in Writer and view/edit your new imported document.
Creating a new document using the Remix method
You can remix content from an existing book, into a document stub or document from multiple other source documents using IGP:Reader. If you maintain a library of shared books, this can be the fastest way to assemble large complex documents from prepared templates, boilerplates or complete content pages.
Remixing a new document is a two step process. First you must create a document. You can then remix into that document from any other document.
- Create a new document stub using the Create a New Document using the New Document Forms method.
- Open the newly created document using Edit in Writer. A new window will launch and the document will open in Writer mode. The document must contain at least one page. If you used a Document template, some pages will exist, otherwise you will have to insert a page.
- From the Document Toolbar, click the Insert New Page button. The Insert New Section/Page dialog box will open.
- Type in a title for your new section.
- From the Select a Template drop down, select the required page type. Title Page or Chapter is useful for practice. Wait while the sample page is loaded.
- Click the Insert button at the bottom of the dialog. The dialog will close and the page will be inserted into the document. In a few seconds the Table of Contents will refresh displaying the title you gave to the page. Publish Reader Table of Contents. This will make the document page active for IGP:Reader. You must not forget or leave out this step or the page will not be viewable in IGP:Reader.
You have now prepared a document ready to to be created using Remixed pages. The remainder of the process is carried out using IGP:Reader, which as you will see, is more than just an online content reading application. IGP:Reader is designed as a research, annotate and compile environment to empower various strategies for content reuse.
- From the Document Toolbar click the View in Reader
 button. A new Window will open showing IGP:Reader.
- From the Reading options on the right hand side, click Library View. This will change the interface to show all the IGP:Digital Publisher documents you have available in your Personal Reader/Writer catalog, and your shared Reader/Writer Catalog.
- Select the document from which you want to take content. In this example we are using a document titled Author Biographies. The page Jack London has been selected.
- Next from the right-hand Tools Pane, click Remix. You will again be shown a list of all your documents. Select the document into which you want to remix the page. In this case we are using IGP:Digital Publisher Users Manual.
Remix Screengrabs
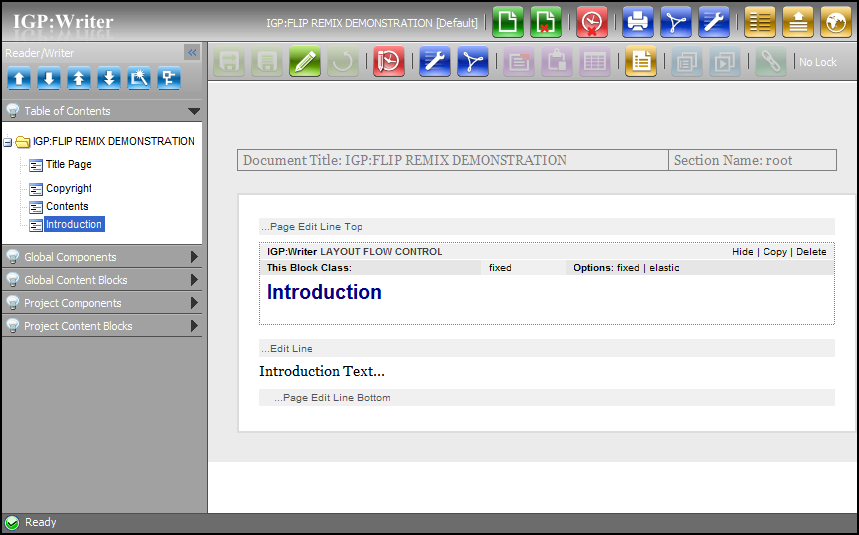
17-5 Open your document in IGP:Writer
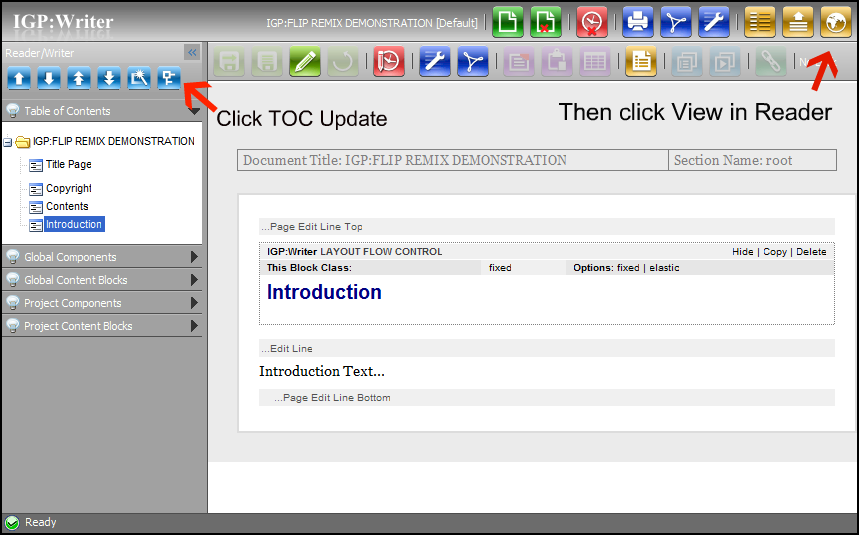
17-6 Click Publish Reader TOC, then launch IGP:Reader
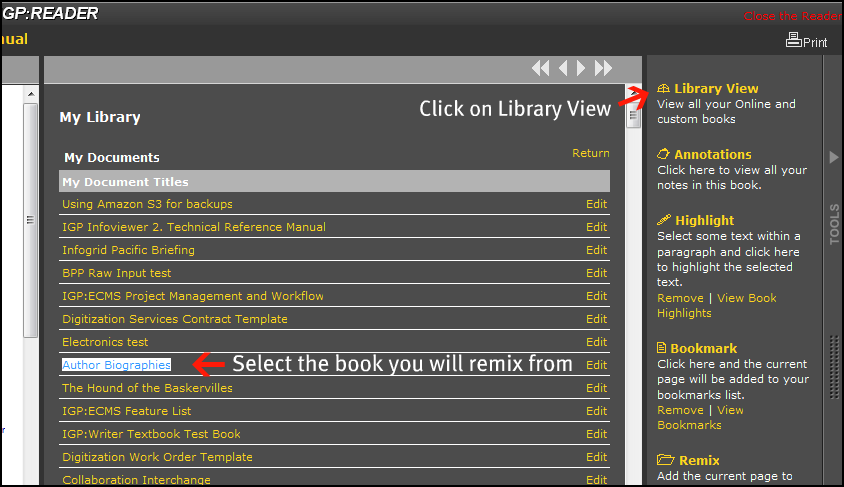
17-7 From Reader Library, select the document you want to mix
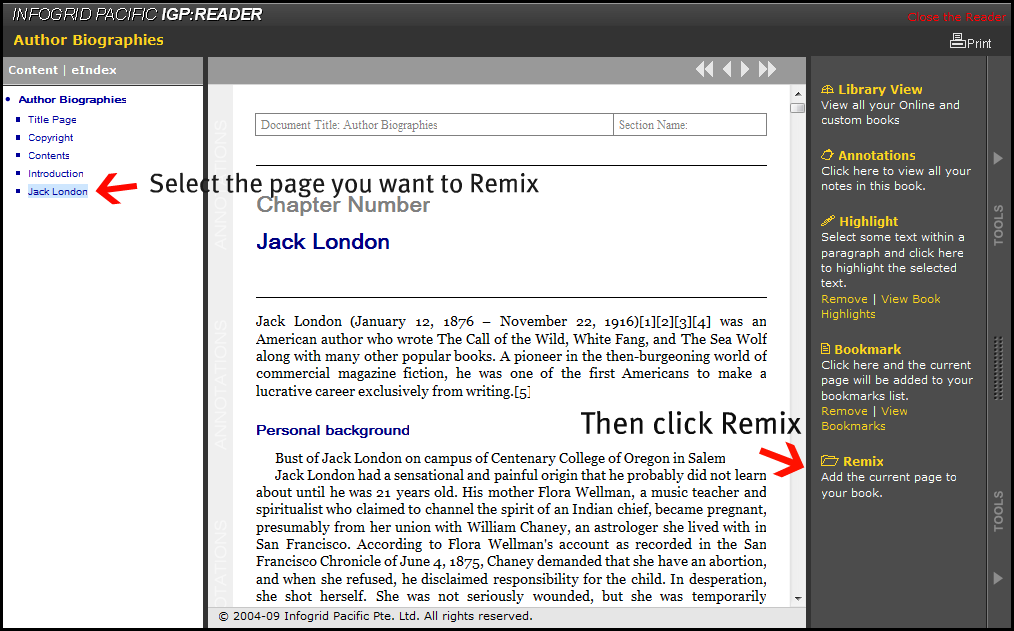
17-8 Select the page in the source document and click Remix
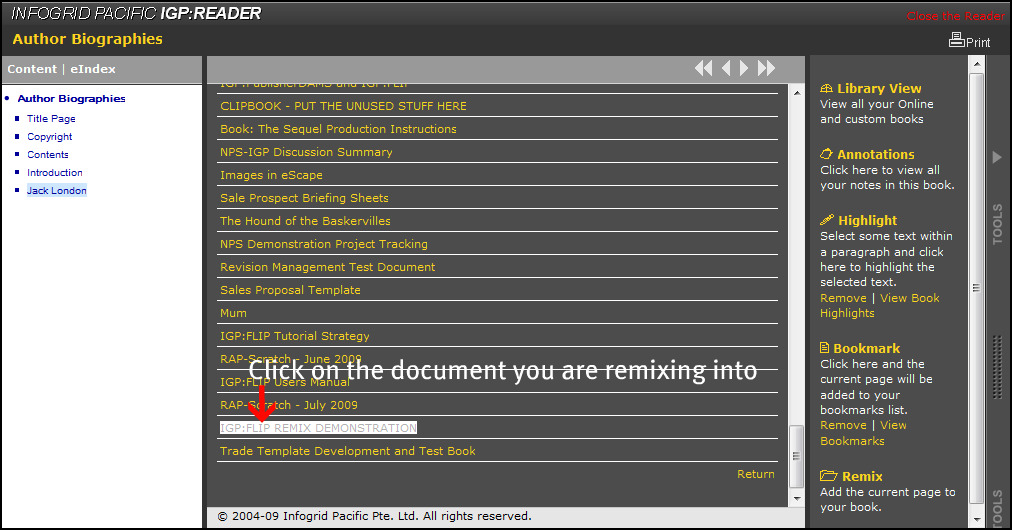
17-9 Select the document you are remixing to. In this case the one we just made
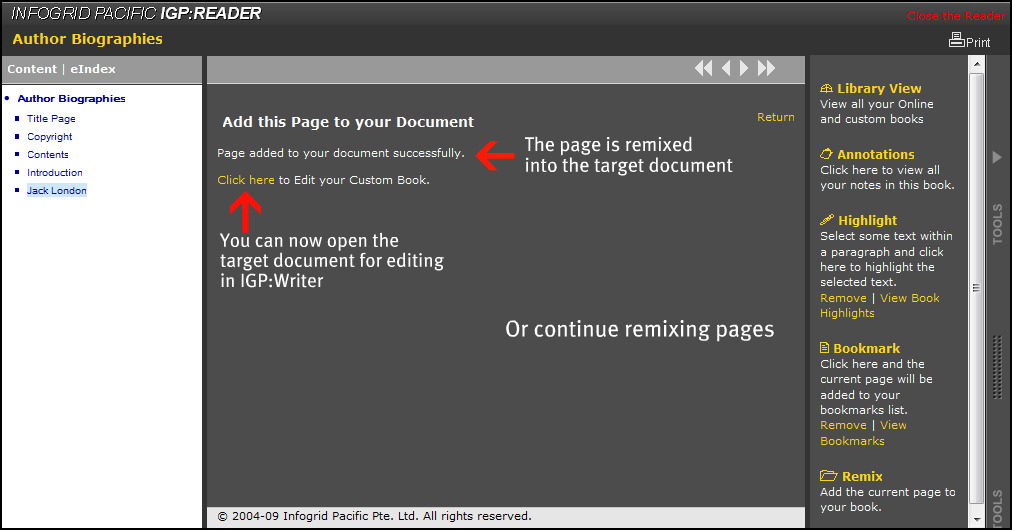
17-10 You can now edit the newly remixed content or continue remixing
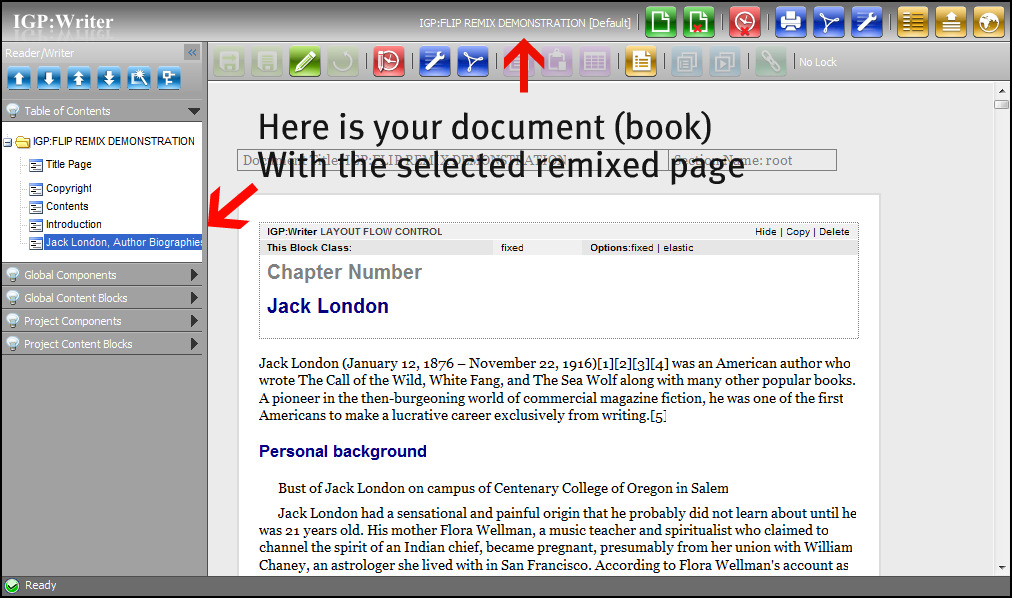
17-11 Here is your document with the remixed page ready for editing.