LEARN@IGP IGP:Distribution Manager

20
ONIX Forms
Main | New Record | ONIX Forms
Create a new ONIX Record form
To Start
- From the Main Page, click the Create New Record button.
- In the New Records page, click ONIX Forms.
- The Create a new ONIX Record form will be displayed.
- Complete the Create a new ONIX Record form.
- Click Save to create a new ONIX Record.
- Click Cancel to quit the creation of a new ONIX Record.
Details of the Create a new ONIX Record - Form
Highlighted fields are mandatory fields. If you leave a highlighted field, then the ONIX form will be evaluated and conformance warnings will be raised for missing information.
The Screengrab of the form has been divided into segments.
Title

-
Title: (Mandatory) Enter the name or the title of the book.
eg. The Hobbit. -
Sub-title: (Optional) Subtitle means any added words which appear with the title of the product and which amplify and explain the title, but which are not considered to be part of the distinctive title.
eg. For the book, "The Hobbit", the words "There and Back Again" is the subtitle.
Enter the Sub-title of the book. (If it has a one)
Contributor

- Role: (Mandatory) Select a role from the Dropdown menu.
- Sequence: (Mandatory) This is an auto-generated field and numbers the sequence in which the contributors will appear.
- First Name: (Mandatory) Enter the First Name of the contributor.
- Last Name: (Mandatory) Enter the Last Name of the contributor.
- Biographical Notes: (Optional) Enter a short biography of the author or the main contributor.
- Add Contributor: Click the link to add another contributor. This action will make another Contributor form appear. It is mandatory to add atleast one contributor.
- Remove Contributor: This link will appear only when you have multiple Contributor forms opened. Click the link to delete a contributor form.
Book Information

- Language of text: (Mandatory) Select the language of text from the Dropdown menu.
- Publishing Status: (Mandatory) Select the Publishing Status of the book from the dropdown menu. Here you can set the status of a book as Withdrawn if you don't like to make the book active for distribution.
- Number of Pages: (Mandatory) Enter the number of pages of the book.
- Publication Date: (Optional) Enter the date of publication of the book. The date must be entered in YYYYMMDD format
- Year First Published: (Optional) Enter the year when the book was first published. The year must be entered in YYYY format.
- On Sale Date: (Optional) Enter the date when the book was/will be on sale. The date must be entered in YYYYMMDD format
- Edition Number: (Optional) Enter the Edition Number of the book.
- Imprint: (Optional) Select the imprint from the Dropdown menu. The list of imprints has to be added firstin the Controlled Vocabularies section of the application.
Identifiers
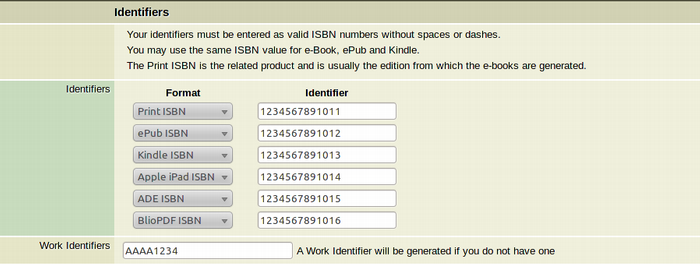
- Format: (Mandatory) Select the format of the book from the dropdown menu.
- Identifier: (Mandatory) Enter the Identifier(ISBN number) of the book in the entry field.
- Work Identifiers: (Optional) Enter the Work Identifier of the book. If you don't add a Work Identifier in the ONIX form, the system will generate a Work Identifier for the product. Work Identifiers can be Alphanumeric formats. eg. AAAA1234.
Title Series

- Title of Series: (Optional) Select the Title Series from the Dropdown menu. This has to added first in the Controlled Vocabularies section of the application.
- Number Within Series: (Optional) If the book is a part of a Series, enter the number of the book within the Series.
Description

- Main Description: (Mandatory) Enter the main description of the book.
The description of the book should not have any HTML markups.
Audience Range

-
Audience Code: (Optional) Audience Code is an ONIX code, derived from BISAC and BIC lists, which identifies the broad audience or readership for whom a product is intended.
From the Dropdown menu, select the intended audience or readership of the product. -
Qualifier: (Optional) Audience range Qualifier is an ONIX code that specifies the attribute (like Age, School Grade etc) which is measured by the value in the Value field given below.
From the Dropdown menu, select the intended qualifier of the product. -
Precision: (Optional) Precision is an ONIX code specifying the “Precision” or the Range of a value in the Value field given below. The three Precision options are "From", "To" and "Exact".
In DM2 we only use the "Exact" Precision of the value. -
Value: (Optional) In the blank field, enter the value of the product according to its Audience Range Qualifier.
The correct way of entering the Value of a product is explained below.
How to enter the Value of a Product
Say, when the Qualifier of a product is US School Grade, then the Value of the product should be entered as:
| Sl | Value to Enter | Description |
|---|---|---|
| 1 | from n1 to n2 | For Grade range from n1 to n2 |
| 2 | from n | For Grade n and upwards |
| 3 | to n | For Upto Grade n |
| 4 | n | For Grade n only |
Table xx Your Caption
where "n" is a grade number or one of the words "pre-school" or "kindergarten", which may be abbreviated to letters P or K.
Similarly, when the Qualifier of a product is Interest Age in Years/Months, then the value of the product should be entered as:
| Sl | Value to Enter | Description |
|---|---|---|
| 1 | from n1 to n2 | For Age range from n1 to n2 |
| 2 | from n | For Age n and upwards |
| 3 | to n | For Up to Age n |
| 4 | n | For Age n only |
Table xx Your Caption
where "n" is an integer representing the age in years/months.
Subject Classification

- BISAC Main Subject Code: (Optional) Enter the BISAC Main Subject Code of the book.
- BISAC Main Heading: (Optional) Enter the BISAC Main Heading of the book.
- BIC Main Subject Code: (Optional) Enter the BIC Main Subject Code of the book.
- BIC Version: (Optional) Enter the BIC Version of the book.
- BIC Subject Category: (Optional) Enter the BIC Subject Category of the book.
- Keywords: (Optional) Enter the keywords of the book. Each keyword should be separated by a semi-colon between them.
Rights Profile

- Rights profile: From the Dropdown menu, select the Rights Profile you want to assign to the new ONIX record (book).
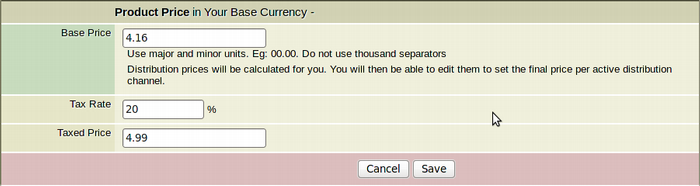
Product Price
-
Base Price: (Mandatory) Enter the Base Price of the book. This price should be in the Base Currency.
While entering the Base Price, use both major and minor units.
Wrong: 100
Right: 100.00
You also cannot use thousand separators.
Wrong: 1,119.00
Right: 1119.00
-
Tax Rate: (Optional) Enter the tax rate if applicable.
-
Taxed Price: (Optional) Enter the Price of the Book including tax for your currency in your country.
Select the Checkbox if no tax is levied in your region.
Pricing Rules
- The Base Price is mandatory information and must be provided. The Base Price is the price of the book excluding tax in your currency.
- The Tax Rate and Taxed Price are optional and only required if tax is applicable in your country/territory and a distribution channel requires it.
- If the Base Price is the only information provided, a single excluding tax pricing composite will be generated for the book.
- If the Base Price and Taxed Price information is provided, the excluding tax and including tax pricing composites will be generated for the book.
- The price composites that are generated for other currency (using the price conversion values provided by you) will always be calculated against the Base Price.