LEARN@IGP

13
Document Processors
Document Processors apply document wide processes such as ID generation, linking and number generation. There are also options for generating TOCs and List of... content pages, plus note and footnote processing options. Updated: 2012-07-27
Overview
Essential for any digital content system is the ability to make the content processor friendly so you can do a lot of different things with it. Core to this is ID generation. Linking and referencing is highly dependent on ID generation.
Because of the systematic tagging patterns employed in IGP:FoundationXHTML it is possible to carry out very advanced content processing operations. These include:
- Generating content. Examples include Tables of Contents and Indexes.
- Moving content. Examples include positioning footnotes, and notes where you need them.
- Linking content. Examples include page numbers to Index references, note and block references to their respective items.
- Processing Instructions. Examples include specific reader/print exclusions and Design Profile exclusive inclusion.
Perhaps more than any other toolset Document Processors demonstrate the power of well crafted XHTML, FX in particular.
Accessing Document Processors 

You can access Document Processors from Editing Tools.
Click on the Editing Tools button. The Editing Toolbar will open.
From the Editing Toobar click the Document Processors button. Document Processor tools will open in the Tool Panel.
The Interface
The Document Processor interface has a number of options to generate and move content more or less at will. Processing depends on the FX being created correct.
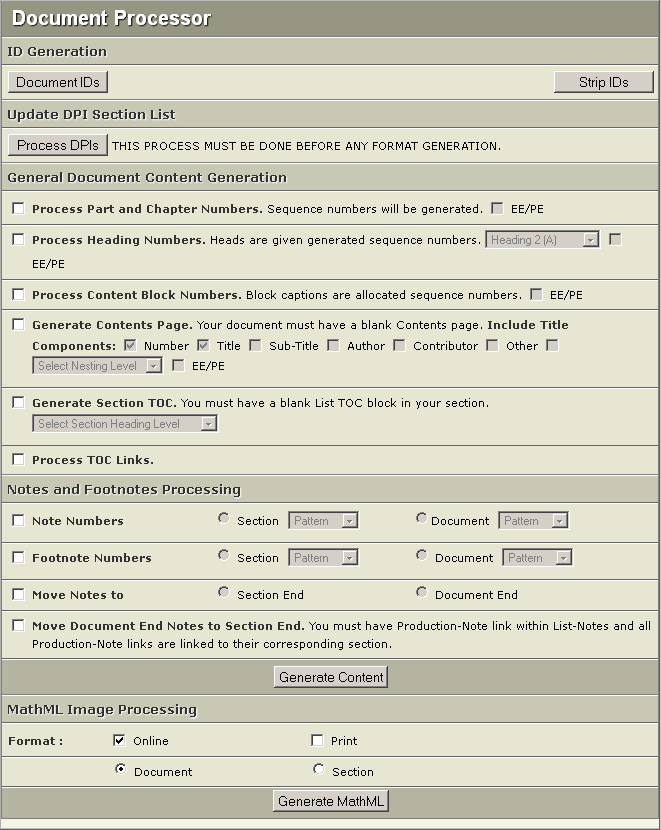
When you open the Document Processor tools you see this interface in the Tools Panel. There are a number of options which are relatively independent of each other. Generally as long as ID's have been generated these will all act in a predictable manner.
Document Processors allow you to make large global changes to your content. Some of the changes are irreversible (generally moving processing), while others can be used repeated and at any time (TOC generation for example).
Document Processors must be used with care, forethought and a precise knowledge of what is going to happen. If you are new to DP and its processing power consider taking a copy of your document the first time you use these tools.
ID Generation
ID Generation is the core processing instruction that must be run before most other processors are used. It is simple to use and can be used at any time. ID's are generated automatically during format generation, but during production, many content processes may depend on IDs being in place.
DP has two ID generation options. Document IDs and Section IDs. These are mutually exclusive and designed for specific types of content. You must select the correct strategy for the document on which you are working. Generally Document ID generation is the correct option for all documents except for those where the sections may be used as highly independent content with a lot of interactive components.
ID's must be exclusive throughout the document for inter-section Hyperlinking to work and for the main FX file to be valid XHTML5. Generate IDs in the following circumstances:
- If you cut, paste and move a large section of text. The ID generator will replace all duplicate IDs that are created with the cut and paste action.
- After adding a new Section. If you add a new section, when you have finished editing, generate IDs.
- Before Generating Formats. Formats can be generated without ID generation, but it is advised to do so if there are any content moving or positioning requirements.
- Before Generating DPI Sections. The
- Before Hyperlinking. Linking between sections is totally dependent on IDs. They must exist.

Click the ID Generation button and wait for the dialog to inform you that processing is complete. The larger and more complex your document, the longer ID generation will take.
IGP:Digital Publisher processes the FX document with comprehensive IDs. There is a controlled list of elements and FX selectors that don't have IDs applied. These are controlled from the Master Templates configuration. These are listed here for information and completeness.
IGP:Digital Publisher ID Generation Element and Class Control List
;ID GENERATION SETUP STARTS HERE
;List of tags to be excluded during id generation
[Excluded Tags]
tags: a, b, br, caption, col, colgroup, em, hr, i, img, object, pre, strong, span, sub, sup, tbody, td, th, thead, tfoot, tr, circle, defs, desc, ellipse, g, image, line, linearGradient, metadata, path, polyline, polygon, stop, strong, style, svg, switch, symbol, text, tref, tspan, title, use, math, maction , menclose, merror, mfenced, mfrac, mi, mmultiscripts, mn, mo, mover, mpadded, mphantom, mroot, mrow, ms, mspace, msqrt, mstyle, msub, msup, msubsup, mtable, mtd, mtext, mtr, munder, munderover, mlabeledtr, maligngroup, malignmark, mstack, mlongdiv, msgroup, msrow, mscarries, mscarry, msline, cn, ci, csymbol, cs, apply, bind, bvar, share
;Define the list of (span) classes that need to be included in ID generation
[Exception Classes]
Update DPI Section List

The Document Processing Instruction module has an interface that allows book sections to be reordered, renamed and the Section use within an e-book defined. This does not get generated by default and if you need to use the features you must use the Update the DPI Section List processing option.
You must always click the Generate IDs button before using clicking the Process DPIs button.
If you are using DPI Section lists you must remember to always repeat this process if you add or delete sections. This maintains the DPI Section List in syncronization with your table of contents.
If you have reordered your DPI Sections or put in custom numbers and titles, and you click the Process DPIs button again, all your edits will be lost. Therefore it is advisable to only use this option in detail when you are sure all your book sections are included and represent the final document.
General Document Content Generation
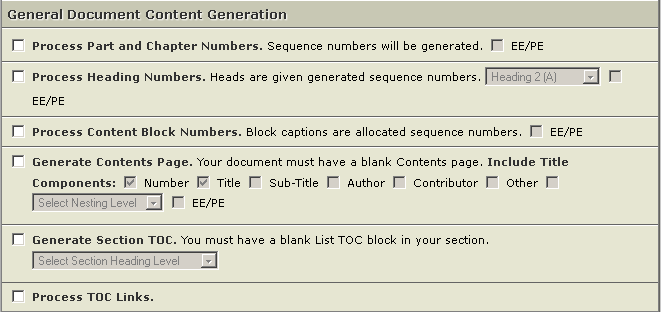
Process Part and Chapter Numbers
The title-numbers in any section title-block are targets for automated numbering and renumbering. If appropriate for your book or document you can run this processor any number of times.
When you select this option and click the Generate Content button, all section numbers are processed by their section-type.
For example Parts have a sequential ascending number and Chapters have separate sequential ascending numbers applied. Numbers are only generated for a section that has a title-num-rw selector included.
If you don't have a number included in a section, for example a Chapter 2 does not have a title-num-rw selector applied. It is still counted in the sequence, no number is applied to Chapter 2, but the following Chapter will be numbered Chapter 3.
This feature is particularly useful for dynamic and changing documents (such as this website). It may not be so useful for a standard book.
If a particular book is NOT using decimal numbers for section numbering, do not select this option. You will have to key the data yourself. For example if your book style is "Chapter One", and you run this processor, it will be processed to "1".
If you want to use a title-number label such as Chapter 1, the label (the word Chapter is regarded as the number label) must be tagged with the inline-style Title Number Label. To apply this:
- Select the text to protect in the Title Block and from the Content Blocks inline styles
- Click the Title Number Label tagging option
- The selected text will display a pale yellow background to show the style has been applied.
- Now when you generate Section Numbers the Title Number Label text will be retained but the number will be generated. The result will be "Chapter 1".
EE/PE
- Exclude eBooks (Reader): EE
- Print Exclude: PE
If you have sections in your document that are marked as Exclude eBooks (Reader) (EE) or Print Exclude (PE), you can select this check box to generate Part/Chapter Title Numbers.
You must use this option only when you want to generate separate Part/Chapter Title Numbers for your eBook and Print formats.
Depending upon the formats you generate the numbering order will appear in the final output.
If you wish to remove the separate Part/Chapter Title Numbers generated using the option EE/PE. You must select the check box "Process Part and Chapter Numbers" and click the Generate Content button.
After completing this process the Part/Chapter Title Numbers generated will be removed and sequential numbering the Part/Chapter will be retained.
Heading can be auto numbered in a document. The processor uses decimal numbers by default. This can be customized in the CSS counters.
Select the Process Section Numbers check box. Make sure no other check-boxes are selected if this is the only processing you want to carry out.
Click the Generate Contents button. The processor will immediately number all Headings in your document with the pattern 1.1.1.1.
- The first number is the Section number.
- The second number is the Heading 2 (A-Head) number.
- The third number is the Heading 3 (B-Head number.
- ...and so forth.
You can select the heading levels where you want the section numbers generated.
For example; if you want section numbers only till h4's and not for h5 and h6 then you must select the option Heading 4(C) from the drop down list and click the Generate Content button.
To remove the generated numbers, select the option Remove Numbers available in drop down list and click the Generate Contents button.
EE/PE
- Exclude eBooks (Reader): EE
- Print Exclude: PE
If you have sections in your document that are marked as Exclude eBooks (Reader) EE or Print Exclude (PE), you can select this check box to generate Heading Numbers.
When this option is used, separate heading numbers will be generated for EE and PE. Depending upon the format you generate the heading numbers will appear accordingly in the output format.
The option EE/PE for Process Heading Numbers works best when selected in combination with the EE/PE option under Process Part and Chapter Numbers.
If you wish to remove the separately generated heading numbers using the option EE/PE, you must once again select the check-box Process Heading Numbers and click the Generete Content button.
Process Content Block Numbers
If your document contains Figures, Tables, Maps, Illustrations, Equations and Plates you can automatically generate the numbers for these blocks.
Numbers are generated in the pattern SectionNumber-SequenceNumber. For example the fourth Figure in Chapter 14 will be numbered "Figure 14-4".
All numbered block sequences are processed as separate sequences.
When you have processed these numbers creating (See ...) links from the text is easy. You only have to put the ref-figure-rw tag onto the number and the link will be created automatically during format creation.
EE/PE
- Exclude eBooks (Reader): EE
- Print Exclude: PE
If you have sections or content blocks in your document that are marked as Exclude eBooks (Reader) (EE) or Print Exclude (PE), you can select this check box to generate Content Block Numbers for the Figures, Tables etc.
When this option is used, separate block numbers will be generate for EE and PE. Depending upon the format you generate the block numbers will accordingly appear in the output.
The Option EE/PE for Process Content Block Numbers works best when selected in combination with the EE/PE option under "Process Part and Chapter Numbers".
If you wish to remove the separately generated content block numbers using the option EE/PE, you must once again select the check box Process Content Block Numbers and click the Generate Content button.
Process Frontlist Index
If you have used the built in e-Indexer tool to create Index terms in the content you can generate the Index at any time.
For more information on this topic please refer to the Tagging Patterns-Named Lists Section of this document.
You must have a valid Index-rw backmatter section in place. This is the target for the Index.
Alternatively if your Index is small and you do not want to use a full page, you can included a Named List Container block index-lists-rw anywhere in the document. This must contain a list-index-rw seed structure.
Warning If you place multiple Index pages and/or Container blocks, they will be generated multiple times.
Generate Table of Content Pages
Generating Content Pages is one of the biggest operations on a near complete document. Generate Contents pages will generate all sequence ordered named-lists in your document.
Table of Contents
The Table of Contents has a number of complex generation options. You can choose to include any or all of the tagged text-lines from title blocks. This includes:
- Title Number
- Title
- Sub-title
- Author
- Contributor
- Other title-block text
In addition you can specify that Headings are also included in the TOC if that is appropriate for your document.
- To generate a Table of contents make sure you have a TableOfContents-rw section inserted into the frontmatter of your document.
- Select the Generate Contents Page check-box.
- Select the checkboxes for the content items you want to appear in the generated TOC.
- If you want section Headings to appear in the TOC, check the Select Nesting Level check-box and then select what level of Headings you want to appear in the TOC.
- Click the Generate Content button.
- Navigate to, or refresh (without saving) your Table of Contents page. You will see your generated TOC page with the options you selected displayed there. You can instantly check it out the presentation with Reader Online and Print presentation views.
Lists of ... Content Pages
If your document contains any numbered blocks, and if target List of... section pages have been included in frontmatter, the contents for those pages will be generated at the same time as the TOC. This includes:
- List of Figures
- List of Tables
- List of Maps
- List of Plates
- List of Illustrations
- List of Equations
All the standard List-of-XXX pages have a list generated with their reference number and caption. Print formats also show the page number, e-book formats have hyperlinks created from the List of XXX structure to the appropriate block where-ever it occurs in the text.
EE/PE
- Exclude eBooks (Reader): EE
- Print Exclude: PE
If you have sections in your document that are marked as Exclude eBooks (Reader) (EE) or Print Exclude (PE), you can select this check box to generate a separate Table of Contents for Reader (EE) and Print (PE).
Depending upon the format you generate Print or eBooks one of the two TOC's will be included in the output.
In an event where you only want a single TOC in your document. You must not select the option EE/PE under Generate Contents Page however in this case the individual sections that are marked as EE (Exclude eBooks) or PE (Print Exclude) will not appear in the TOC page of the output. This will depend on the format you are generating.
Note: When sections are marked as EE/PE, classes (exclude-reader or exlude-print) are assigned to the sections , headers and sub-headers. Basis of these classes the processors will exclude the list items form the TOC.
This will work similarly in case of the List Of Figures, Tables, Equations, Illustrations, Map and Plates.
Generate Section TOC
You can generate a local TOC containing the page headings for any section. This is a Chapter or Topic TOC that lists the Headings in a section. For example: this website Topic page uses the Section TOC feature everywhere.
- You must insert a section container block and a list-section element into your section at the place you want it to appear.
- To generate a Section TOC click the checkbox.
- From the selector choose the depth of Headings you want to appear in the Section TOC.
- For digital formats you also have the option of linking the headings on the page, back to the top of the Section. If you want this select teh Process TOC links checkbox.
- Click the Generate Content button. All sections that have Section TOCs included will be immediately updated.
- You can repeat this process any number of times.
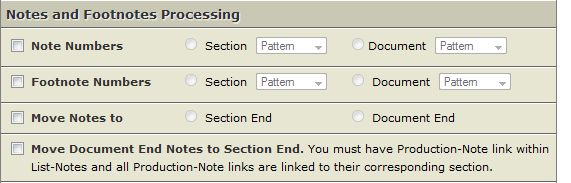
Notes and Footnotes Processing
See the FX Notes and Footnotes Processing Test Book for more advanced information on note and footnote tagging.
Notes and footnotes are one of the most difficult processed structures to understand and get correct. This is especially true in books with large quantities of notes.
Notes and footnotes processing relies on there being matching references and numbered blocks to function correctly. It works for both front-list and back-list production notes and footnotes.
The Note and Footnote tagging and processing strategies have to handle the following combinations of note creation:
- Importing notes which have been prepared in a word-processor manuscript
- Authoring and editing notes and footnotes directly into the text through the edit window
- Tagging notes and footnotes for retrodigitization of existing books from electronic files such as PDF, or OCR'ed and proofed hard copy.
Each of these strategies result in a different layout of notes in the XML document. They only have one thing in common. The note references in the text, and the actual notes are nearly always in the same sequence. DP takes advantage of this.
If your notes are in the correct position and correctly numbered from your imported manuscript you do not need to do anything.
Note Numbers
Note references in the text must be tagged correctly with Inline Ref Notes and Ref Footnotes tags. Likewise the notes must have their numbers tagged.
In front list book production these do not have to have the numbers applied. Placeholders will be replaced when notes are process. Example:
This contains a note referencexx in the text.
This is another note referencexx in the text
This contains a footnote referencexx in the text
xx This is the note that is referred to by the first note
xx This is the note that is referred to by the second note reference
Note here that in the writer view the reference number is blue (showing it has link status), and the note/footnote number is red (showing it has variable or processing status).
The processor always expects to find notes and footnotes after their reference in text, and processes them in sequence.
Footnote Numbers
If you are using typographical characters for footnotes (*, **, †, ‡, etc.) do not use the Footnote number generator as your characters will be over-written.
Select the footnote numbering pattern you want to be applied. You can number footnotes repeating by section or exclusive for the whole document. This option is provided because the concept of page footnotes is not strong in e-books.
Currently in e-books footnotes are processed to the end of the section much like section notes. In the future as devices improve their performance it is more likely these will become interactive popups. This can also improve accessibility of notes and footnotes.
Move Notes
When you process front list notes you can choose to move them to the respective section ends or the document end.
If you are moving them to a Notes section at the end of the document you must have a Notes-rw section inserted in backmatter.
Move Document End Notes
Move notes to section end exists for two reasons.
- Many academic books have references and notes at the end of the chapter. Trade books, which normally don't have as intensive notes, usually accumulate the notes at the end of the book in a Notes section.
- This is OK for print, but in e-books we have to assume notes are linked, or even processed for popup action. Linking across many sections to the end of a book is hard work for many reading devices and can be very slow. It is therefore highly recommended that notes are processed to the end of their respective sections.
With DP you can have both. Notes can exist at the back of the book for the print editions, and at the end of sections for e-book editions using the exclude-print-rw and exclude-reader-rw processing instruction options in the blocks.

MathML Image Processing.
MathML Image Processing
Refer to the MathML Production page for information on this feature
Resources
The following test books are provided to assist with learning the various tagging patterns and also allow practice with safe content before working with live content.
FX: Frontlist Note and Footnote Tagging Test Book.
This is an FX Archive package. You can upload it to your system by creating a new document and importing the package.
Download the Archive Package
Imported Notes Test and Training Manuscript
This word-processor manuscript has a number of notes created in the word-processor. These import and are linked as backnotes.
Download the Doc manuscript file.
FX Retrodigitization Note and Footnote Tagging Test Book
This is an FX Archive package. You can upload it to your system by creating a new document and importing the package.
Download the Archive Package
a This is the footnote that is referred to from the reference number