LEARN@IGP IGP:Writer
28
Media Manager
How to
This topic explains how to use the Media Manager to organize and use graphics and other media in multiple formats.
Note: This topic does not give instruction on how to prepare images for print.
Feature Overview
Media Manager is where you maintain and access your images, graphics and other media. Here you can:
- Upload images and Media Manager will automatically generate multiple images for various formats.
- Use settings to configure how images are processed in each tab context.
- Select and insert images directly into your XML document.
IGP:Digital Publisher is a multi-format production environment that produces print PDF, Online and mobile delivery pages, e-Book formats and various content packages. To reduce the amount of repetitive image processing you have to carry out externally, Media Manager processes images for all formats based on certain rules. These are:
- The uploaded image is assumed to be the highest resolution image and is probably the print image.
- If you are targeting print your uploaded image format must conform to your printer's requirements. That generally means it will be CMYK, 300dpi for grayscale and color if the target is PDF X1A, or RGB with an embedded CIE profile if the PDF is going to be PDF X3.
- The system applies the _print.* identifier to the uploaded images.
- Other images get appropriate file name extenders. The most common one is _online.* which is used for web views and e-book formats.
To Open Media Manager
- Open the Live Preview Pane
- From the Manage Tools group, click Media Manager.
- The Media Manager interface will be displayed in the Live Preview Pane.
Interface
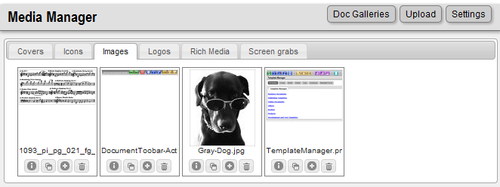
- Galleries. Media Manager opens in Gallery View. Here you can view and interact with any media you have uploaded for the document. Media Manager has different tabs for different types of media.
- Upload. You can upload multiple or single files directly to any of the Galleries. As images are uploaded they are processed according to the predefined settings accessed through the Settings button.
- Settings. Click this button to open the settings window to configure how Media Manager processes images when they are uploaded.
Note. Media Manager does not like files with spaces in the filename. If you upload any file with spaces in the filename they will be converted to underscores. Eg: Upload - my image.png, will become: my_image.png.
The Gallery Item
Each Gallery item has a thumbnail presentation, four buttons and the following behaviours.
- Thumbnail Roll Over. Place your cursor over the small thumbnail image (without clicking) to see a larger view of the image.
- Information. Click this button to view all available information about each file. You can see the details of all files Media Manager has generated for each media item. Click view to open and preview each image in a new browser window. You can also download the images from the browser view to your desktop if required. The Print and Online image also have a Process option that allows you to interactively resize the individual images proportionally if required.
- Copy. Click this button to open the Copy Image dialog. Here you can enter a new name for the file, change the Gallery and generate a copy of the image. The copy will be processed using the rules
- Insert Options. You can double click on an image to insert it directly into the document at the cursor position as a figure (by default). Click the Insert Options button to view other insertion options including inline image insertion.
- Delete. Click the Delete button to remove an image and all generated files. This action is irreversible.
Uploading Files
You can upload single or multiple image files.
Note the multiple file upload uses the HTML 5 Multiple standard. If your browser does not support HTML5 you will not be able to use multiple file upload.
- Click the Upload button. The Media Upload Dialog will open.
- From the Tab Selector, choose which tab context for the images being uploaded. Note you can only use one Target Location tab context at a time, so you will have to repeat the operation for images uploaded to each Target Location context.
- Click Browse to locate the file(s) on your local disk you want to upload.
- Click Upload. Your image will be uploaded and processed. You will immediately be able to see the image thumbnail inside the tab location which you selected for the upload.
Settings
You can modify the image processing settings at any time. These adjustments are global so any changes will affect all subsequent images uploaded.
All image upload operations generate two thumbnails, 100px and 300px on the long side. This is fixed in the system and cannot be changed.
You can configure how images are processed for each tab context to generate optimum print and Online images. The processing options are:
Resize
Minimum Size
Format
Inserting Images
There are a number of ways of inserting images.
Inserting a numbered figure
- To insert an image in a figure block, position your cursor in an empty paragraph in the insertion position.
- Note that images must be inserted between paragraphs. You cannot insert one into the middle of a paragraph. If you do, it will create two new paragraphs.
- Double click the image. It will immediately be inserted into the cursor position complete with its XML figure block. By default it will insert as a numbered media item. That means it will have a blank caption.
- You can now use the Block Controls to change the presentation parameters of the image.
Insert Media Options
You can insert an image into different types of Content Blocks for different purposes.
Click on the Insert Options button. The Insert Options dialog will open.
The Content Block insertion options are:
- Insert as un-numbered image
- Insert as a plate
- Insert as an Icon Paragraph
The Inline insertion options are:
- Insert as a symbol. Use this for icons and symbols.
- Insert as a character. Use this if you are using images for character or character like items.