LEARN@IGP IGP:Digital Publisher Management
22
Master Fonts
Main | Maintenance | Master Fonts
- Setting up a new font in Font Manager
- 1. Create a font-family
- To Start
- To create a new font-family
- Details of the Create Font Family form
- 2. Uploading Font faces
- To Start
- To upload font-faces
- 3. Assigning font-face to a font-family
- Map a font to a Font family
- To Start
- To map a font to a Font Family
- Details of the Map Fonts to Font Family form
- Update Font family Properties
- To Start
- To update Font family Properties
- Details of the Update Font Family Properties form
- Set up a new Term
- To Start
- To set up a Classification Term
- To set up a License Term
- Delete a term
- To Start
- To delete a term
The Master Fonts is the storage area of all fonts used in documentations.
IGP:Digital Publisher includes a Font Manager module which once set up handles all of the font CSS mapping issues in the IGP:Digital Publisher print templates and documents.
IGP:Digital Publisher comes with a base set of free and Open Source fonts. You must upload and manage any other fonts you want to use in your documents.
Setting up a new font in Font Manager
Setting up a new font consists of carrying out the following steps:
- Create a font-family
- Upload the font faces
- Assigning the font faces to the font-family
The font is then ready to be used in any document. Behind the scenes the full CSS-3 statements have been generated and are waiting to be applied to any document.
1. Create a font-family
Font files must be mapped to a font-family statement to be useful in IGP:Digital PublisherCSS templates.
You can map any fonts to any font-family name, but it is generally most useful to use the original font-family name as assigned by the font foundry. For example, the Adobe Bembo font faces include:
BemboStd-ExtraBoldItalic.otf
BemboStd-SemiBold.otf
BemboStd-SemiBoldItalic.otf
BemboStd-Bold.otf
To Start
- You must have maintainer privileges to create a new template.
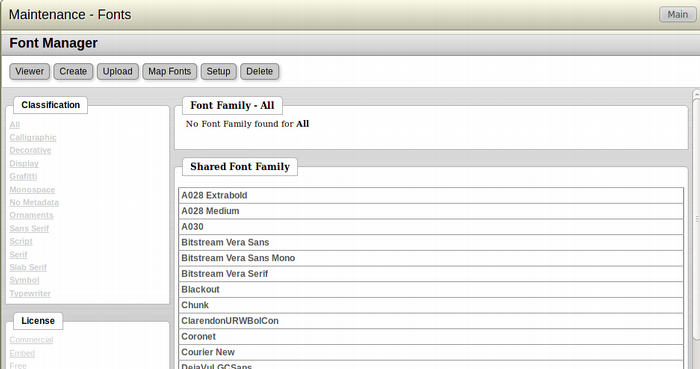
- From the Main Page, click Master Fonts under the Maintenance section. This action will transfer you to the Maintenance Fonts page.
- The Maintenance Fonts page displays the list of all Font-families (Shared and Private).
To create a new font-family
- From the top left toolbar in the page, click Create to create a new font-family.
- The Create Font Family form will appear.
- Fill in the various field of the form and click Save to create the new font-family.
- Click Cancel to close the form without creating a new font-family and return to the previous page.
Details of the Create Font Family form
All fields of the form are mandatory.
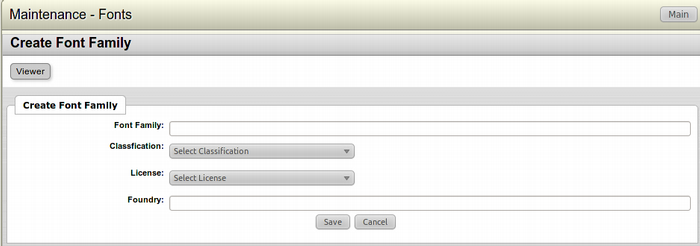
- Font Family: Enter the name of the font-family.
- Classification: From the Dropdown menu, select the classification to make it easier to explore and select fonts.
- License: From the Dropdown menu, select the type of license so that users clearly know whether or not they can use fonts embedded in Websites, e-pub packages, or other distribution packages.
- Foundry: Enter the name of the foundry from which the font originated. Eg. Adobe Type, Bitstream etc.
2. Uploading Font faces
Depending on your fonts and from where you have purchased them, they may be single files, or multiple font faces for different font styles. In both cases the font file has to be uploaded into the system.
To Start
- You must have maintainer privileges to create a new template.
- From the Main Page, click Master Fonts under the Maintenance section. This action will transfer you to the Maintenance Fonts page.
- The Maintenance Fonts page displays the list of all Font-families (Shared and Private).
To upload font-faces
- From the list of Font families available in the Master Fonts page, select the family in which you want to upload the font-face.
- From the top left toolbar in the page, click Upload to upload a font-face in the font-family.
- The Upload Font form will appear.
- Browse for the font-face you want to upload by clicking the Browse button. After selecting the font-face, click Upload to upload the font in the font family.
- Font Style: From the Dropdown menu, select the Font Style of the font-face. Eg. Normal, Italic etc.
- Font Weight: From the Dropdown menu, select the font weight of the font-face. Eg. Normal, Bold etc.
- You can repeat this for all your font files.
- When you have finished uploading font files. Click Cancel to return to the Maintenance Fonts page.
3. Assigning font-face to a font-family
You must associate a font file with a role in a font-family that will be useful in a CSS product sense.
Assigning a font-family to a document font style
IGP:Digital Publisher pre-assigns a wide range of font-family roles in the print template. It makes use of the CSS properties to simplify both automated and manual maintenance of complex font to document style relationships. The font-family styles map directly to IGP:FoundationXHTML.
The pre-defined font-families are:
- Bodytext. Applied from the galley-rw statement.
- Body-alt. Applied from F2: Bodytext.
- TitlesAndHeaders. Use this selector to apply a font-family that is different to the bodytext to Titles and Headers.
- Titles. Use this selector if you are going to use a different font-family on document / Book Titles and headers.
- Heads. Applied from F5: Use this selector if you are using different font-families for bodytext, titles and headers.
- A-Head. Applied from F5: Use this selector if you are going to use a different font for A-Head
- B-Head.
- C-Head.
- D-Head.
- E-Head.
- Running-heads
- Symbols
- Ornaments
- Math
You can add your own special font-family - style definitions, or use direct font definitions onto a CSS selector at any time.
Map a font to a Font family
To Start
- You must have maintainer privileges to map a font to a font family.
- From the Main Page, click Master Fonts under the Maintenance section. This action will transfer you to the Font Manager page.
- The Font Manager page displays the list of all Font-families (Shared and Private).
To map a font to a Font Family
- From the Font Manager page, select the font you want to map.
- After selecting the font click Map Fonts from the top left toolbar in the page to open the Map Fonts page.
- The Map Fonts to Font Family form will open.
- Perform the necesarry changes in the form and click Save.
- Click Cancel to quit the mapping of a font to a font family. This action will take you back to the Font Manager page.
Details of the Map Fonts to Font Family form
- Font Family: This field displays the name of the Font Family. This field cannot be edited.
- Current Fonts: The current font section displays the fonts that are mapped to the Font Family along with a preview of the font. To remove a particular font from the font family, click the Remove link besides the particular font.
- Font: From the Dropdown menu, select the font you want to map to the Font Family.
- Font Style: From the Dropdown menu select the style of the font.
- Font Weight: From the Dropdown menu, select the Font Weight.
Update Font family Properties
To Start
- You must have maintainer privileges to update the properties of a Font family.
- From the Main Page, click Master Fonts under the Maintenance section. This action will transfer you to the Font Manager page.
- The Font Manager page displays the list of all Font-families (Shared and Private).
To update Font family Properties
- From the Font Manager page, select the font you want to update.
- After selecting the font click Map Fonts from the top left toolbar in the page to open the Map Fonts page.
- The Update Font Family Properties form will open. This form is below the Map Fonts to Font Family form.
- Perform the necesarry changes in the form and click Save.
- Click Cancel to quit the update of the font family. This action will take you back to the Font Manager page.
Details of the Update Font Family Properties form
- Classification: From the Dropdown menu, select the Classification Group in which you want to put the Font Family.
- License: From the Dropdown menu, select the form of licensing of the Font Family.
- Foundry: Enter the name of the foundry in which the Font Family belongs. This is a text-entry field.
- Shared for Use: Select the Checkbox if the fonts in the particular Font Family can be used by anyone.
Set up a new Term
To Start
- You must have maintainer privileges to set up a new Classification term.
- From the Main Page, click Master Fonts under the Maintenance section. This action will transfer you to the Font Manager page.
- The Font Manager page displays the list of all Font-families (Shared and Private).
To set up a Classification Term
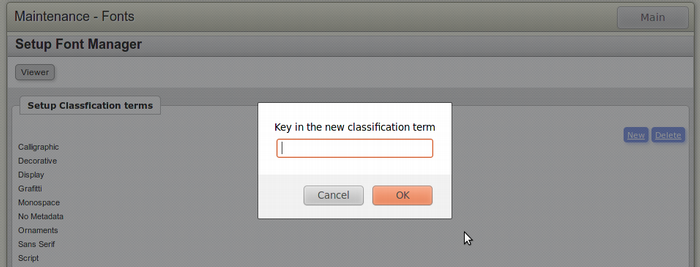
- From the top left toolbar in the page, click Setup to open the Setup Font Manager page.
- To set up a new Classification term, click the New button in the top right toolbar of the Setup Classification Term section.
- A text-entry box will pop up prompting you to "Key in the new Classification Term".
- Enter the new term in the text entry field.
- Click OK to save the new term or Cancel to return to the Font Manager page.
To set up a License Term
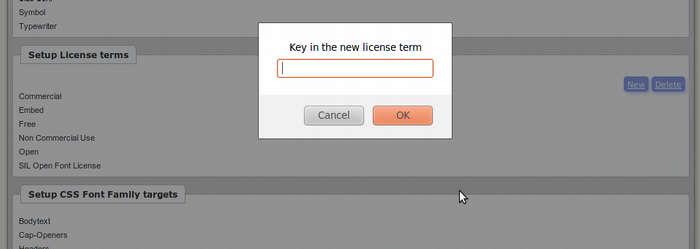
- From the top left toolbar in the page, click Setup to open the Setup Font Manager page.
- To set up a new Classification term, click the New button in the top right toolbar of the Setup License Term section.
- A text-entry box will pop up prompting you to "Key in the new License Term".
- Enter the new term in the text entry field.
- Click OK to save the new term or Cancel to return to the Font Manager page.
Delete a term
To Start
- You must have maintainer privileges to delete a term from Master Fonts.
- From the Main Page, click Master Fonts under the Maintenance section. This action will transfer you to the Font Manager page.
- The Font Manager page displays the list of all font families (Shared and Private).
To delete a term
- From the top left toolbar in the page, click Setup to open the Setup Font Manager page.
- The Setup Font Manager page displays the list of terms of both Classification and License in separate sections. A section for Setup CSS Font Family Targets is also there. But this section cannot be edited.
- From the list of terms in Classification and License, browse for the term you want to delete.
- Select the term you want to delete by highlighting it.
- Once the term is selected, click Delete from the top right toolbar of the particular section.
- A Confirmation dialog box will open. Click OK to confirm the delete or Cancel to return to the Setup Font Manager page.